A guide to your new Apple Mail
Apple Mail is used to manage all of your email accounts in one central location.
Many people have at least two emails, commonly a work email and a personal email, which can be difficult to maintain. Thanks to Apple Mail, you can access email accounts from various platforms on one user-friendly interface.
1) How to Set Up and Use Apple Mail On macOS
To set up Apple Mail on macOS:
First click on the “Mail” icon on your computer, which should be on your computer’s bottom icon bar.
When you first open “Mail,” the application may force you to enter an email.
If for whatever reason it doesn’t, or if you want to add more emails, navigate to the top of your screen.
Press “Accounts,” which will launch a “System Preferences” pop-up box with possible internet accounts.
If you have an email from a common provider, like Gmail, then all you need to do is click on the applicable icon and enter your login credentials. With less popular email servers, you need to get the incoming and outgoing mail server settings from the email host.
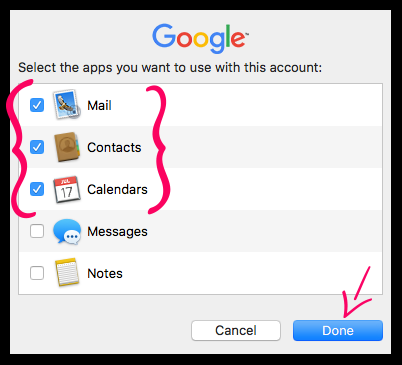
After you enter your email and password, another box will populate that says “Select the apps you want to use with this account.” Emails store much more than inbox and outbox information. Many platforms also have contacts, calendars and more. Go through the menu and select the features you want Apple Mail to access.
Next, open the Apple Mail application again, and your inbox should load into the platform. Your unread emails will have a blue dot next to them. When you click on a message, the blue dot should disappear, and the email will open on the right-hand side of your screen
Within the right-hand side, you can scroll to see the whole email. Another option is to click on an email twice, which will open it full screen in a new pop-up window.
When you’re looking for a specific email, you can use the “Sort” feature. In the “Sort by …” drop-down box, you can look emails up by date, flags, subject and more. If you have macOS Sierra, in addition to using the “Sort by” feature, you also has access to a filter that will show you only your unread messages.
In an attempt to better organize your inbox, Apple Mail groups conversations for you. Whenever you have a back-and-forth conversation with someone, your mailbox will group the conversation into one thread. Next to the conversation, a number will signify how many emails are contained within the file.
If setting all this up is too difficult for you then consider getting professional help through HelpCloud Technician by-the-hour.
To send an email,
- click on the “New Message” or “Compose” button and a new window will appear
- To add someone’s email, you can type their name into the “To” filed if they’re already saved in your address book. New contacts can be emailed by typing out the entire email address
- The subject of the email should be short and inform the receiver of what info will be in the body
- A body of an email should contain the most information and can also include hyperlinks, attachments and more
- To add more fields, click the menu next to the “Send” button or paper airplane icon and then select what items you want to have in your email
- One good thing to add is either “Bcc (blind carbon copy),” “Cc (carbon copy)” or both
A blind carbon copy means that you can add multiple people to the email, but the receivers won’t see the other recipients emails. A carbon copy sends an email to additional people and allows all the recipients to see the other users on the email message.
Changing the text of your email is possible, too, meaning you can alter the text font, size, color and make various other stylistic changes. The best way to change your body is to select the text you want to change and then use the formatting menu at the top of the email window. Your default text preferences will be set for you, but you can change them if you’d like. Select “Mail” on the top bar of your computer, “Preferences” and go to the “Fonts and Colors” tab. The menu allows you to change the font, color and other features.
While you have this menu open, you may want to add a signature to your email, as well.
A signature is simply a block of text that is put at the end of every email. Normally, a signature has things like a sender’s name, contact info or website URL. Hit the “+” on the window and title the signature however you’d like, such as “New Signature” or “[Insert Your Name] Signature.” The signature will then come up so you can edit it however you’d like.
After you create your signature, you will drag the signature’s title to the appropriate email account. Then, click on the appropriate email account and make the signature default with every message so it always populates. If you don’t want it in a specific email, you can always remove it from the body.
There are a lot of ways to send an email from the Apple Mail program. When you make an email from scratch, simply hit the “Send” button after you’re finished. What about when you find a document you want to email, though?
To attach a file to your email, click the “Attach” button in the toolbar, select the file(s) you want to send and then send the information. Another option to attach is simply to drag files from your desktop or the “Finder” into your message. A quick way to send photos is to click the “Photo Browser” button in the toolbar and then drag the desired image into your message.
One fun way to customize emails with photos is to use the “stationary pane.” The farthest logo to the right on the top of your email’s display box allows you to add an interesting background to your email’s body.
One thing to keep in mind when emailing is that Windows users might have different applications than you, which is why you should send attachments to these users in a specific way. In a message to a Windows user, click “Edit,” “Attachments” and “Always Send Windows-Friendly Attachments.”
This way, all future attachments to the entered email will be compatible with Windows.
For a one-time Windows-Friendly attachment, click the “Attach” button and then click the box for “Send Windows-Friendly Attachments.” You can attach many files in an email, but some are too large to send in this way. Larger files can be shared using Mail Drop, which uploads large files to iCloud where they’re stored for around 30 days.
When someone sends you a photo attachment, it will likely open in the body of the email. Documents and other files don’t open automatically, but you can preview them by clicking on the attachment’s icon and then hitting the spacebar on your keyboard.
When you do this, a window will open that shows you a preview of what’s in the attachment without downloading the information. To exit the view, simply hit space again.
To download, hover over the middle of the message bar and click the paperclip icon. When you do this, you’ll see a drop-down menu where you can save all of the attachments in an email or just one of the attachments. Then, your computer will ask where you want to save the file.
Another important tool is the left-hand sidebar. Using the icons, you can navigate through your mailbox’s “Inbox,” “Trash,” “Sent,” etc. To access this sidebar, make sure the “Mailboxes” tab in the upper left corner is selected. Or, you can hide the feature by unchecking “Mailboxes,” which will make your inbox overview fill the left side of your screen.
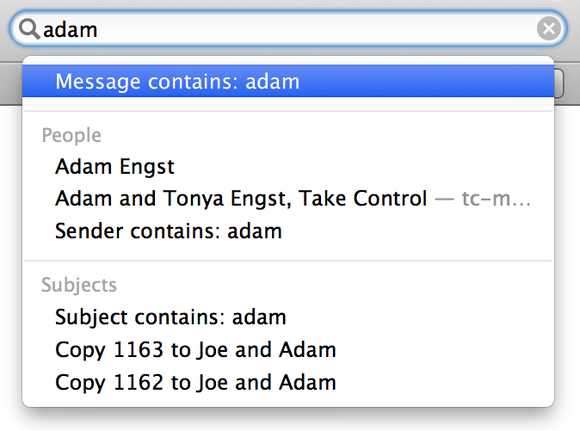
One of the best features in Apple Mail is Apple’s search bar. Within the app, you can search for a specific person, keyword, phrase, timeframe and more. For example, you might type “Show me all the emails from Maggie in the last two weeks” or “Christmas cards.” Using your search bar will save you countless hours that you might otherwise waste scrolling through your mailbox.
Another thing to look out for is the “Get Mail” button, which you can press if your mail isn’t updating. Regularly, you do not need to hit this button, as the mailbox should routinely update on its own. The “Flag” button is also useful for saving important emails for later. When you flag items, you can access them later in the “Flagged” mailbox on the left-hand or top menu bar of your mail application.
At some point, you might find that you’d like your default menu to be changed. You can alter what you see by clicking the “View” tab at the top of your screen. Hit “Customize toolbar …” and add or remove icons as you see fit. One great thing to add is “Smaller, Bigger,” which allows you to change the size of the text you see when an email displays.
Customization is key when it comes to enjoying your Apple Mail experience. One way to customize your experience is to create folders within your email accounts. To create your own folder, hover over the account of interest in the left-hand menu, hit the “+” button that comes up and name the new mailbox.
Title the mailbox how you’d like, such as “Airline Tickets,” and click “Save.” Then, you can file away all of your airline tickets in this folder. With this folder, you’ll never have to anxiously search through your email for a ticket the night before a trip again. Other useful folders are “Bills,” “Photos From Family” and “Receipts.”
2) How to Change and Reset Your Apple Mail Password
After you’ve reset changed your password with your mail server, you need to update your Apple Mail. There is something called Simple Mail Transfer Protocol (SMTP), which requires that you update your password in your outbound mail settings. You also need to update the password in the incoming mail settings.
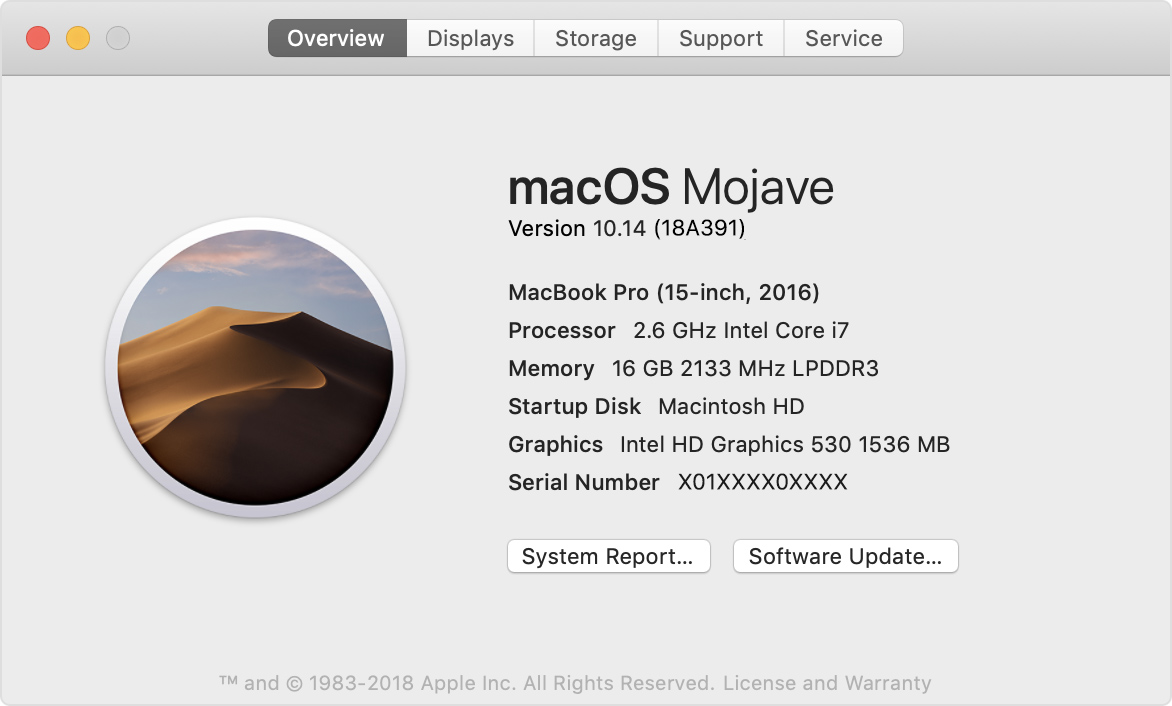
- First, make sure you’re running version 10.12 or higher of macOS Sierra
- To see your OS, click the “Apple” icon in the top left of your computer. Select “About This Mac,” and a window that shows you information about the operating system you’re running will display. No matter what OS you’re running, look to see if you have any available updates and install them if they’re available. (see image below)
- Next, open your Apple Mail. Select “Menu,” “Preferences” and “Accounts”
- On the left-hand side, select the account you need to update
- Then, look to the right side of your screen and find the “Server Settings” section
- Once you’re in the tab, you will type in your new account password in both the “Incoming” and “Outgoing” fields
- After you do this, send an email to yourself as a test to insure everything is working properly
Users with older operating systems can still update their passwords in Apple Mail:
- On your computer, open your “Mail” application
- Under “Preferences” pick the “Accounts” button
- On the left of your screen, select the email that needs to be updated
- Then, on the right side, locate your “Outgoing Mail Server”
- Under “Outgoing Mail Server,” hit “Edit SMTP Server List”
- Under the “Advanced” button, type your new password into the “Password” field
- After you’ve typed in your password and clicked “OK,” close the window
- Open your “Mail” application again and ensure you can send emails properly
3) How to Download, Set Up and Use the Apple Mail App On an iPhone
With an iPhone in hand, you’ll probably feel like there’s nothing you can’t accomplish. From taking photos to emailing on the go, the iPhone provides pretty much everything you could want on one device.
Before you start emailing on your iPhone, a little setup is required. Most iPhones come with the “Mail” app already loaded because it’s a preinstalled application. You may also notice that applications like Calculator, FaceTime, Compass, Maps and more come standard on your phone.
How to Download and Setup the Apple Mail App on Your iPhone:
- If you can’t find the emailing app, open your “App Store.” Within the search bar, type in “Mail” The icon of the Mail app should then populate, and all you need to do is click the cloud icon next to the application so it can download
- Next, you’ll probably have to go in and install or reinstall your email accounts
- To set your email up quickly, tap “Settings,” “Passwords & Accounts” and “Add Account” on your iPhone. Select your email provider’s logo, and enter your electronic mail’s information. Hit “Next,” and the application will take a minute or so to verify your account
- In the event you don’t see the logo of the company you use to email, you’ll need to setup the account manually. To do this, go to “Settings,” “Passwords & Accounts” and “Add Account.” Under “Other,” select “Add Mail Account”
- After you’ve entered your full name, email account details and a description of your account, hit “Next.” Your app should then fetch your email and finish setting up your account. You might have to hit “Done” to finish setting up your email once your account is found
- If your iPhone can’t fetch your email, you’ll need to enter it manually. Once you’re in Apple Mail, choose Internet Message Access Protocol (“IMAP”) or Post Office Protocol (“POP”). If you’re not sure what email you have, contact your email’s host or reach out to your technical computer support company
- After you know your email account type, select its tab and then enter the information required for both “Incoming Mail Server” and “Outgoing Mail Server.” As soon as your information is entered, tap “Next” followed by “Save”
- After a few seconds, your account should be verified. You can then choose the information you’d like to access, from your contacts to your calendars. As soon as you’ve decided what features you’d like your email on your iPhone to have, select “Save”
If you ever want to change your password or any of your email’s settings, tap on the email account of interest, and then you can change your preferences. If you tap the account’s name a second time, you can edit the password or even delete the account.
As soon as your email is saved, open the mail application. Your iPhone should display all the emails within the specific accounts you’re accessing. New accounts will have relatively few emails, but if you have an older email address, you might find that your phone loads many emails.
When you tap on “Mailboxes,” you’ll be able to access every email account you’ve added. From this page, you can navigate through your “Inbox” and “VIP” menus.
The “VIP” section allows you to quickly find mail from people you’ve deemed important. To create a “VIP” contact, select “Add VIP” and then choose the contacts that require your utmost attention.
Next, you’ll see a grey header titled “Mailboxes.” Under this section, the iPhone displays “Drafts,” “Sent,” “Junk,” “Trash,” and “All Mail.” There’s an “Edit” button near the top right of the screen, which allows you to alter various features that are built into the application.
The next thing to learn is the actions you can take from a specific email. In your inbox, tap on any email. Once the email is up on your iPhone screen, you’ll see several icons at the bottom of the screen.
On the far left is a flag, which you can use mark specific emails. The next icon allows you to spend emails to a specific folder so your email will be organized. The center button lets you archive messages for as long as you see fit. The icon to the right of the center will help you reply to the email, forward it to another email address and also print the email.
Lastly, the icon on the far right bottom of your screen will let you create a new email.
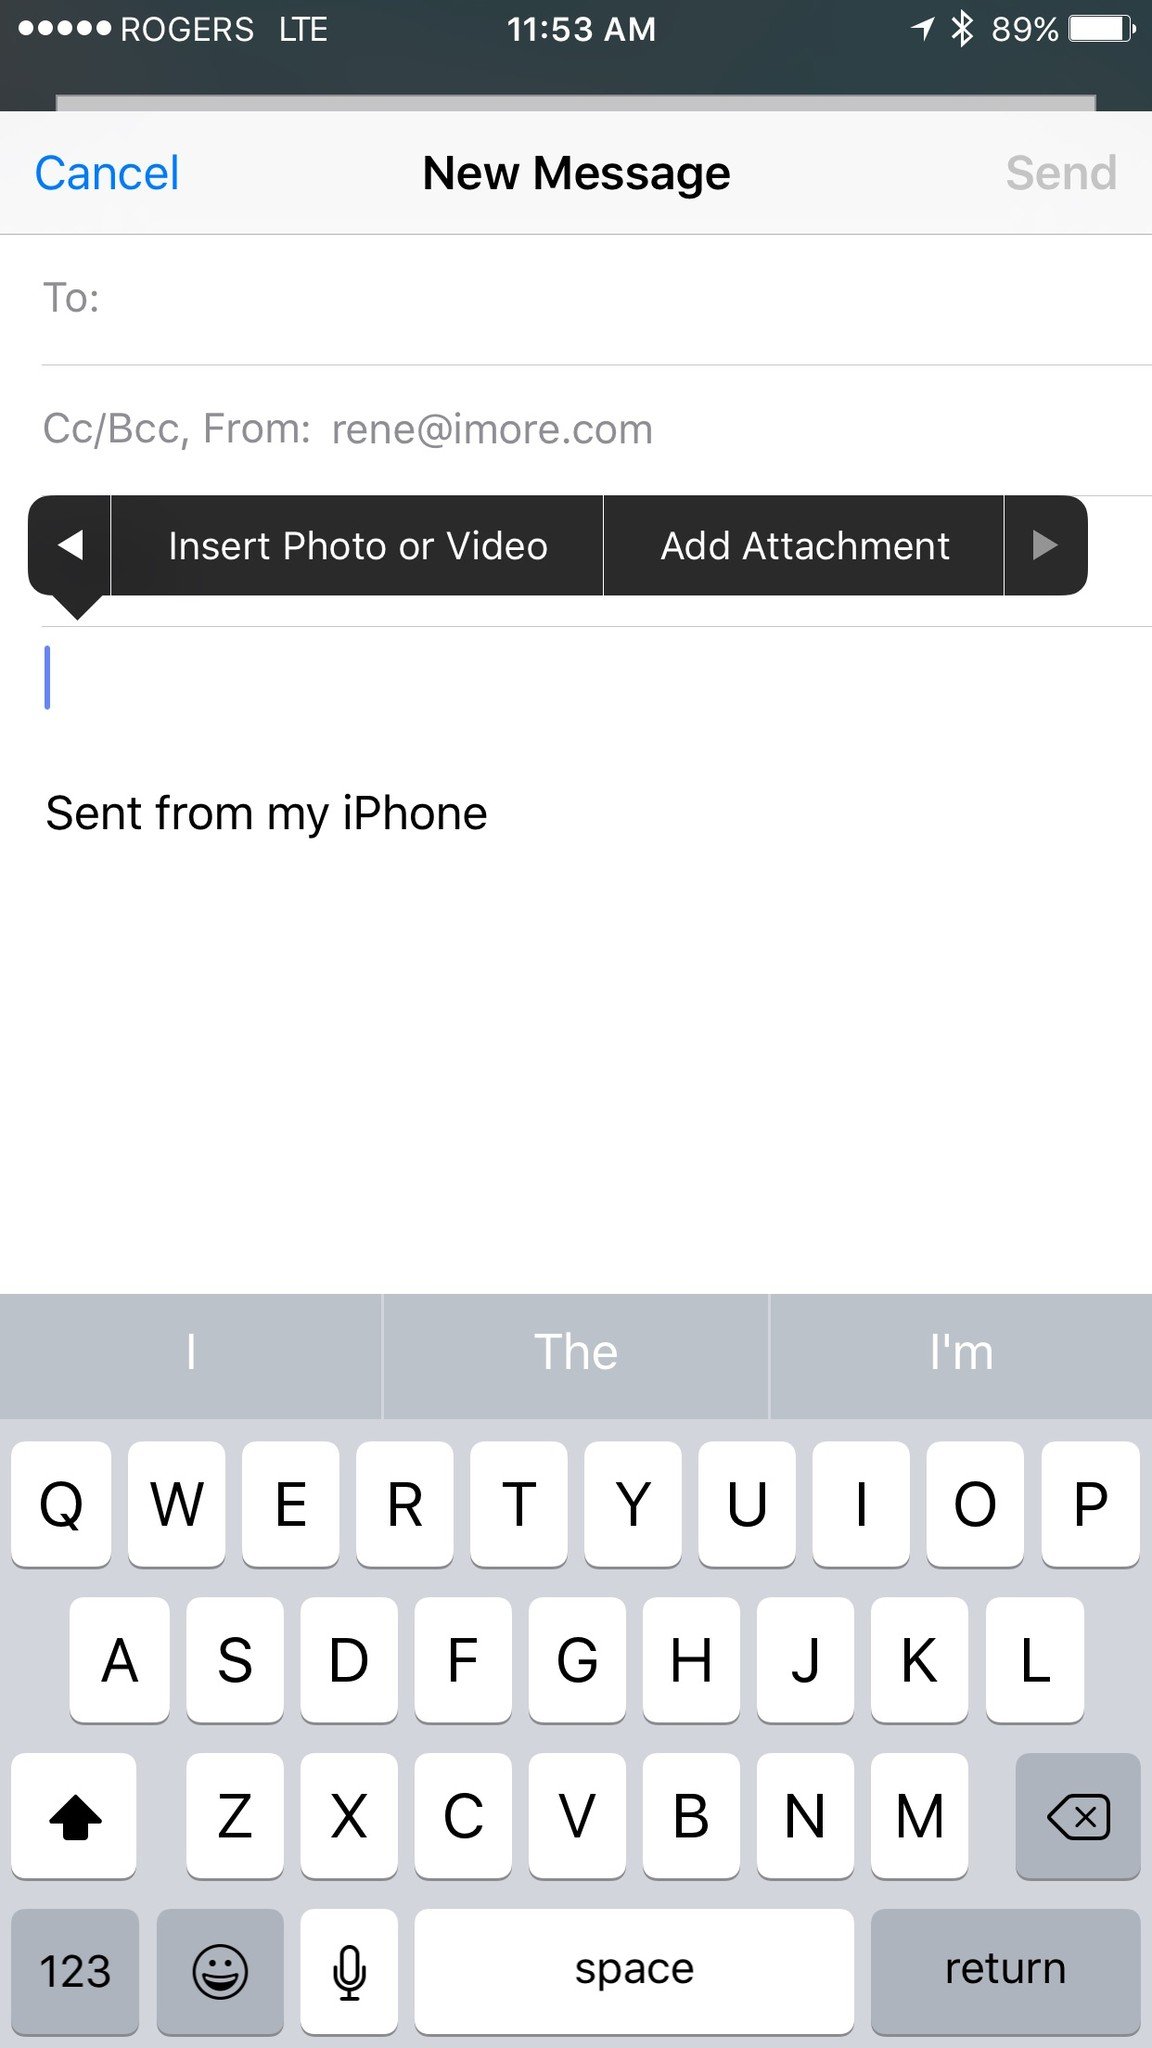
At the top of your screen, you’ll see two arrows that let you scroll through your emails. Lastly, you can tap “Email” in the top left of your screen to get back to the email’s menu. When sending a new email, hit the icon in the bottom right of your screen.
A new window should open, which may remind you of composing an email from your computer. The blank email will have “To,” “Cc/Bcc” and “Subject” sections. On the computer, adding attachments is relatively easy. On the iPhone, adding photos, videos and more is a bit more complicated.
To add something to your email, you need to press your finger in the body of the email and hold it down until a circle appears. As soon as you see a circle, remove your finger and a black menu should populate. Hit the arrow within this menu, which is on the far right, and then you’ll have the option to insert a photo or video.
After you fill in these fields and add needed attachments, you’re ready to send your email. As a test, you might want to put your email in the “To” section and send an email to your own account first.
When you get a new email, your “Mail” app should have a notification above it letting you know you’ve received a new piece of mail.
To make a new email even more obvious, you can change a few settings on your iPhone:
- Under your phone’s “Settings,” scroll down and then select “Mail, Contacts, Calendars.” Within “Fetch New Data,” you can control how you’re notified when an email is received
- To always be notified, enable “Push.” When this feature is on, new data is sent to your iPhone when possible.
- To save battery life and limit data use, turn the “Push” feature off. After this feature is disabled, select one of the “Fetch” options. When you use this type of setting, your emails will be downloaded less frequently, saving your battery and conserving data usage
- After you know how you want your email to be downloaded, go back to your general “Settings” menu and select the header “Notification Center.” Scroll down until you find the “Mail” application
- After the app is open, you can choose how you’d like to be notified when you get a new email. “None” will not display your emails for you. “Banners” will make the email appear at the top of your screen. “Alerts” populate as a box in the middle of your screen. Users can even alter the sound they want to hear when they get an email from within this menu
- Looking down farther on the screen you’ll see the “Alerts” section, where you can decide if you want the email to show in your “Notification Center” or on your “Lock Screen.” The “Show Preview” feature is also useful, as it lets you get an understanding of what an email is for without having to open the actual email that very second
Apple Mail Is Here to Stay
Whether you’re a senior citizen trying to age in place with smart technology or a college student who’s trying to stay organized, email is an amazing technology that can help improve many aspects of your life. After you know how to set up and use email properly, you’ll be amazed with how much it can do for you.