
It doesn't matter whether you are part of a company or just a private individual, what matters, is that when you go online your data and information are protected. We all want to protect ourselves - whether it is from burglars roaming the neighborhood or the felonious actions of hackers and dark web trawlers that hide behind computer screens.
One of the ways that many protect their online presence is by having what is called a VPN, or Virtual Private Network. A VPN will successfully mask your computer's IP address and in the process protect your data and information by diverting it through secure servers in other countries or states. This protects your online identity so that you are able to browse online without someone being able to pinpoint your location or see your private information.
It's incredibly useful to have a VPN but unfortunately, as with all software and technology, it can sometimes experience glitches and problems. We've come across a few common issues (one of which is discussed below, as well as in our latest video) which we would like to share, along with the solutions on how to fix them so that your online presence stays protected.
1. VPN Not Connecting
One of the first problems many people may encounter is that their VPN sometimes doesn't want to connect on their Windows 10 or Windows 11 computer. You may find that when you try to connect it just says "connecting" but eventually it times out and doesn't connect.
A quick fix for this would be to go to Start and type in Services. Open the Services app and then scroll all the way to the bottom of the page where you will see the Xbox Live Networking Service.
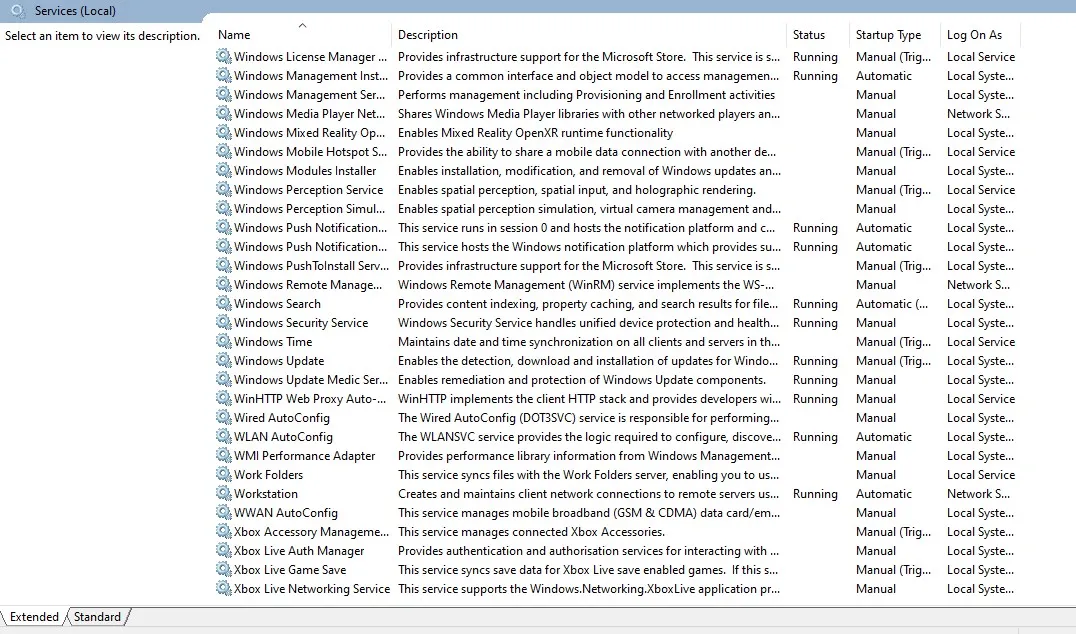
If the service is running it will block your VPN from connecting so you will need to stop the service from running. To do this, you will need to right-click on the Xbox Live Networking Service and then select Stop.
Once you have done that then the word "Running" will disappear from the column next to the service and you can then go and try to connect to your VPN once again.
It should connect this time, but something to keep in mind is that if you disconnect the live networking service you may not be able to use certain Xbox in-game services later on. So, once you are done using your VPN and if you want to use Xbox again, then you will need to right-click on Xbox Live Networking Service again and then just left-click on the Run button.
In the event that you still can't connect to your VPN, it could be due to the fact that your ISP (Internet Service Provider) is blocking your VPN connection and preventing it from connecting. This could possibly be because the DNS (Domain Name Server) entries from your ISP may be incorrect. Should this be the case you will need to "flush" your DNS entries and then clear your internet cache once you are done.
To do this you will need to left-click on Start, type in Command Prompt and then left-click on the Run as Administrator in the window that pops up. Now you will need to type in ipconfig/flushdns and then press the Enter key.
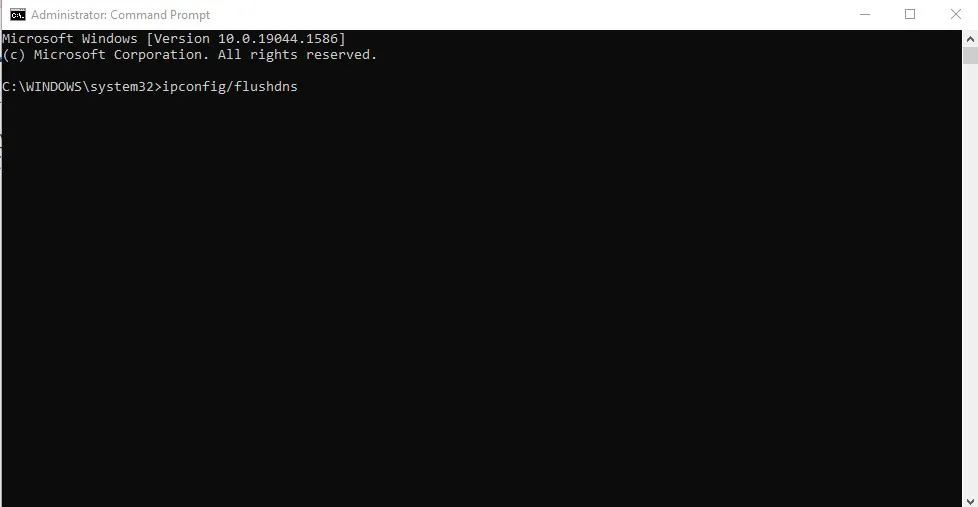
Once the process is complete you ought to get a message that says your Windows IP Configuration has successfully flushed the DNS Resolver Cache. Now you can go ahead and close off the Command Prompt program by left-clicking on the little cross in the top right-hand corner of the screen and then open up your web browser.
If you hold down the Shift, CTRL and Delete buttons on your keyboard all at the same time, it will open up the Clear Recent History dialogue box. Next to the option Time range to clear, select Everything and then only keep the Cache and Cookies check boxes ticked.
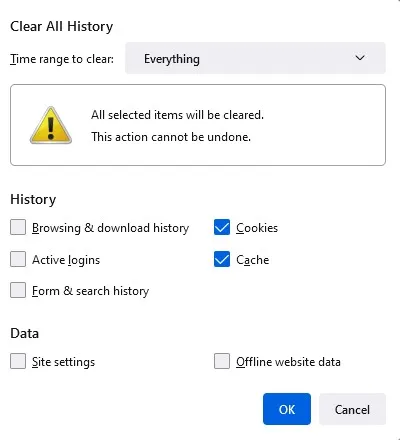
(Image #3 - insert image from the below, correspondingly-named link -- see email attachment)
Now you can go ahead and left-click on the Okay box -- it might also say Clear Now. You can also use this keyboard shortcut (CTRL + Shift+ Delete) on any web browser to open up the dialogue box. Once you're done, you can try connecting to your VPN again.
2. Firewall Is Blocking VPN
The Firewall on our computers has a way of blocking certain programs from running.
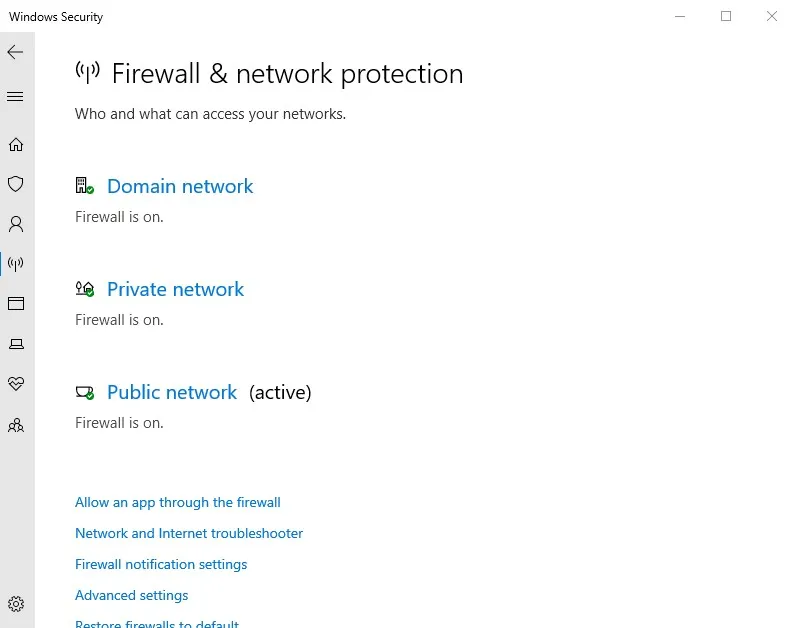
If you're experiencing problems with your VPN connecting, it could quite likely be that your computer's Firewall has blocked it from running. If this is the case, then you will need to enable your VPN software within your Windows Firewall.
To do this, go to Start and then type in Allowed Apps. Open the program by left-clicking on it and then in the left-hand pane select Firewall and network protection. Next you will need to left-click Allow an app through the firewall in the right-hand pane.
This will open up a new window. Here you will need to left-click on the Change Settings tab in the top right-hand of the window and then at the bottom of the page left-click on Allow another app.
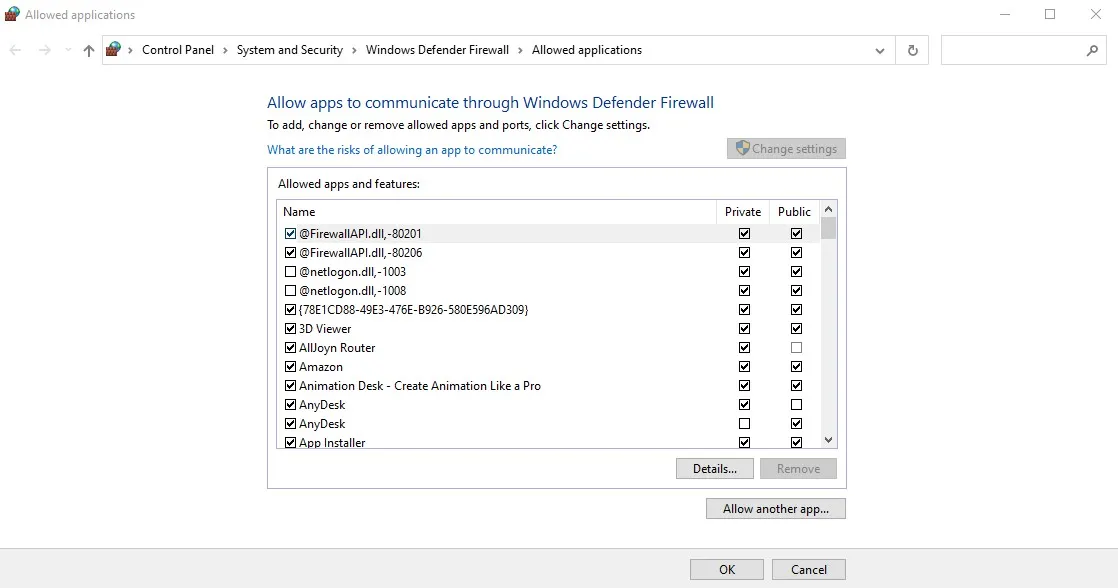
Select your VPN software from the list and then left-click on Okay. If you don't see it in the list provided, left-click on the Browse button to search for it and then left-click on Okay once you have found it.
Next you can try connecting to your VPN again to see if this has solved the problem.
3. Online Streaming Doesn't Work On VPN
In the event that you are using a VPN when you are live streaming programs using Netflix or Hulu etc, you could quite possibly encounter the issue where your connection will time out or you will encounter an error message.

Something to keep in mind is that not every VPN can securely access every single service. Some services, such as Netflix or BBC Prime, will only work reliably with a few VPN's.
If you find that you can't stream online through your VPN, you may want to try making sure that you are using the most up-to-date version of the app. If you are, it could be that you simply need to clear your internet browser's cache and cookies -- as explained in the first point.
Lastly, you could also try connecting to a different VPN server. Usually, the best VPN server to connect to is the one that is closest to you as this provides the best speeds. However, should you wish to stream content that is region-locked, you will need to connect to a server from that region.
To change to a different server, simply open your VPN app, left-click on a different server location and then connect to that server. Once you've done that it should allocate a new IP address to you and once you clear your cache and cookies again -- this time selecting The last hour in the drop down menu as explained in point one.
4. VPN Is Blocking Emails Being Sent
If you find that you suddenly can't receive or send emails whilst using your VPN it could be chalked up to two possibilities. One is that the email service you are using is blocking your VPN's IP address, and the other is that your VPN is blocking the port which your email service uses to send and receive emails.
If your email service is blocking your VPN's IP address it is for security measures. Generally the only unknown IP addresses that try to access one's email inbox come from hackers and freelance felons. It is for this reason that email servers generally block unknown IP addresses from accessing your email inbox.
The solution for this would be to either get a dedicated IP address for your VPN or else to switch to a server that is within your region when you want to access emails. You could also use what is called "split-tunneling" to separate your email usage from your normal online browsing and streaming. That way there will be no need to change servers.

A split-tunnel is when your VPN splits your internet connection in two, one side will use the VPN IP address and the other will connect straight to the internet using your normal IP address.
5. Connection Speed Is Too Slow
There may be times when you are able to connect through your VPN but then the connection speed is just so slow that you can't really do anything anyway. When this happens it could simply be a case of being connected to a server that is too far away. The thing to remember with VPNs is that the closer the VPN server is that you are using, the faster your speed will be.
In addition to this, it could also be that your antivirus software or firewall is slowing down your VPN connection speed. You could run a quick test by turning them off and then see if it improves the speed. If it doesn't, remember to turn them back on again before proceeding.
In the event you find yourself still struggling to connect to your VPN, try resetting it to its factory settings and then restarting your computer. It might sound like a corny and clichsolution but sometimes that is really all it takes - the classic "switch it off and back on again" approach.
As always, if you're needing any kind of additional help with your VPN, consider reaching out to HelpCloud technicians for remote support.