Gone are the good old days of dial up internet when we only connected once a week to check for emails from Pen Pals or far away family. Progress took us from dial up internet to Wi-Fi but even that has changed.
Gone are the days of only needing Wi-Fi at home to keep in touch with close family or friends who may be located in a different state or even out of country. These days we need a stable Wi-Fi connection in order to work from home and submit work reports or school papers.
We all know that sinking feeling when you’re in the middle of uploading a document or even in the middle of an important Teams meeting and everything suddenly freezes and then stops dead and an error message appears letting you know your internet connection has been interrupted. It is highly frustrating and can really put a damper on what was turning out to be a great day.
It’s part of our current technological age, but does it have to be a constant problem?
After all, these days it’s imperative to have a stable internet connection as many of us are now required to work from home. And it’s much harder to reach work deadlines or complete tasks if we aren’t able to connect securely to our Wi-Fi.
There are quite a few reasons why your Wi-Fi could be slow and interrupted and we’re going to discuss five of the most common and ways to fix them in order to speed your internet up without having to go to extremes.
Before you start, though, take a quick internet speed test to see what your current speed is, then you can do it again at the end and see if there was a difference after following the steps below.
To do a speed test, simply go to www.speedtest.net and then left-click on the GO button in the middle of the page. For the test to be accurate, make sure that you aren’t busy with any live streaming or downloading.

Once the test has finished, save the results and then you can follow the steps below. Then you can run the test again at the end to see if there is any improvement.
1. When In Doubt, Restart
This first point is one which every computer technician has, at one time or another, used to fix something. It might seem like a really lame solution, but many times it is all that is needed to shock your Wi-Fi into faster speeds.
All you have to do is to turn your router off for about ten to fifteen seconds and then turn it back on again. If you want to give it a little more time than that, feel free to do so. There is no set time to leave it off, although it’s best to give it at least ten or more seconds in order to make sure that it resets.
Added to this you can also unplug it should you wish to do so, just as long as all power is cut off for a few seconds. Once you turn it back on again you are bound to find that speeds are definitely improved. And since you’re rebooting the Wi-Fi, go ahead and restart the device that you are using to connect to the Wi-Fi as well. It’s always best to cover all the bases, just in case.
2. Check Your Router Placement
It’s not always easy to find that perfect sweet spot that allows your router the best coverage throughout your home, but there are places to avoid and others that would be more beneficial than where you may have it currently.
Where your router is placed will definitely have an impact on your Wi-Fi speed, so it’s crucial that you find just the right spot to set up your router right from the get go. The best place would be in a centralized location that is not near an outside wall, as this will cause the signal to be weaker on the other side of the home.
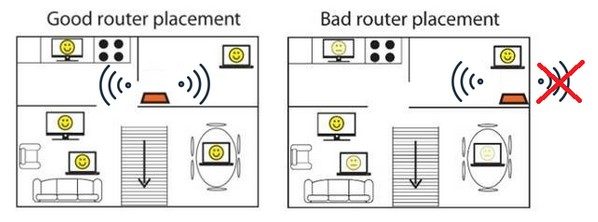
Make sure that your router isn’t placed on the floor and is also not near any mirrors or windows, as this blocks/inhibits the signal. It’s also best to remember that the signal will become greatly impaired if your router is anywhere near electronic equipment, this includes the kitchen and bathroom areas. Ensure that your router isn’t placed in direct sunlight, as long term exposure can cause damage which will adversely affect the internet speed.
Keep in mind that the signal will be strongest when the router is on the same level as the devices you are connecting to the Wi-Fi due to the fact that the signal is being transmitted evenly by the multi-directional antennae of the router.
3. Check (and Change, If Necessary) Your Wi-Fi Channel
Just like with radio channels, wireless signals also work on different channels.
When too many routers are connected to the same channel, it could cause the signals to interfere with one another and that affects the speed of your internet. Not many people are aware that they can check which Wi-Fi channel they are on, even less that they are able to switch to a different channel should they wish to do so.
There is a great program called WiFiInfoView, which is free, and it allows you to check which Wi-Fi channels are running in your area and which one you are connected to.
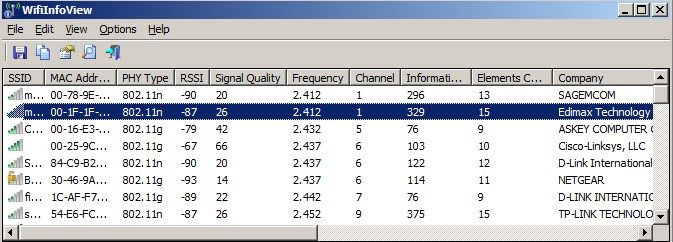
All you have to do is check under the column marked Channel and then see which one is least crowded and switch to that channel.
4. Stop Unwanted Bandwidth Usage
Another reason why your Wi-Fi may be slow is because there are too many connections eating up your bandwidth. In order to prevent this from happening, you need to regularly check which programs or devices are using your bandwidth.
A simple way to check is to left-click on the Start button and then type in Data Usage in the search bar. Then left-click on Data Usage Overview (this may just be named Data Usage depending on which system you’re using) and then select Data Usage in the right-hand panel.

A new window will open up and it will show you all of the programs which you have used in the past 30 days, which are devouring your bandwidth and which ones are just running in the background and not really using anything.
You can also use your Task Manager to check this by pressing CTRL + SHIFT + ESC. The Task Manager will open up and it will show you a list of programs currently running. Left-click on More Details at the bottom of the window and it will show you exactly which programs are using which resources, including your network coverage or bandwidth.
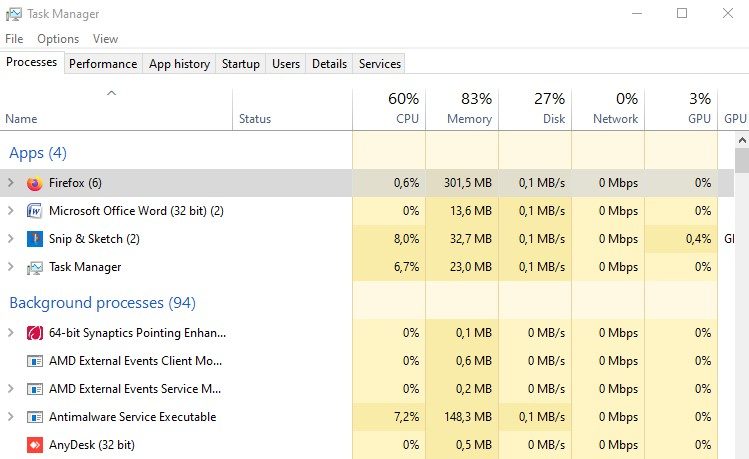
Left-click on the Network tab and it will arrange all the programs in order of which one uses the most bandwidth to the one that uses the least. If you see a program that you don’t use but which is running in the background and using up resources (like Dropbox or OneDrive) then you can right-click on that program in your Task Manager and simply say End Task.
A word of caution here, though — if you see a program that is using up quite a bit of your bandwidth but you aren’t sure what it is, it’s best to check first because some programs are crucial to the running of your computer so you don’t want to end a program that is necessary to the daily workings of your computer.
You can also use GlassWire, which is a free program that will also track data usage on your computer for you. If you’re using a Mac, you can try Bandwidth+ from your Apple Store.
5. Maximize Network Adaptor Settings
This is something which we don’t always think about, but it does make a difference. If you have put your computer in Power Save mode to enable your battery to last longer and to save power, then you may want to check this point out because it could be saving power on your network as well, which is not something you want it to do.
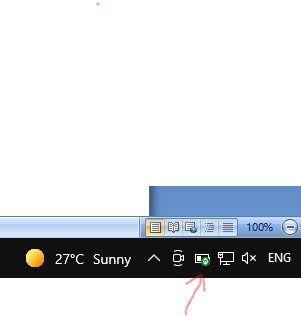
In order to make sure that it’s not cutting your internet performance, right-click on the little battery in the bottom right-hand corner of your screen and select Power Options.
Whichever plan you are using, you will then left-click on Change selected plan and then in the new window that opens up you will select Change advanced power settings.
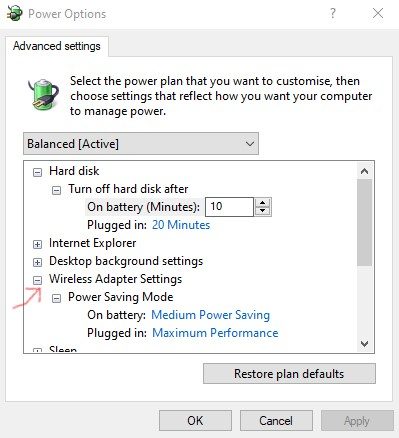
Another new window will open up, left-click on Wireless Adaptor Settings and then make sure that the Power Saving Mode is set to Maximum Performance.
Never Enough …
Even with following all of the above steps we understand that there may be some who feel their Wi-Fi is still running too slow for their liking. In which case, you may want to look at upgrading your router if it’s one that you have had for many years.
Generally, though, these steps should help to speed things up quite adequately.
As always, if you’re needing any kind of additional help understanding how to speed up a problematic Wi-Fi connection, consider reaching out to HelpCloud technicians for remote support.
