Living in a world filled with top of the range gadgets and high-speed internet can really be an adventure of and by itself. It’s almost like living in one of those science-fiction novels we read when we were kids, or being in a movie that involves time-traveling to the future. Except that it isn’t a story, or a movie, it’s the here and now and it is the world which we are a part of today.
It’s a world that now thrives on all things online, and to do these things we need a great web browser. As is usually the case, every person is different and will have individual tastes – this extends to which web browser they prefer to use. That being said, the vast majority of people appear to prefer to use Google Chrome as their go to web browser.
As of September this year, Google Chrome for Android has accounted for 32.85 percent of the global web browser market share, according to Statista.

Since its launch in 2008, Google Chrome has continued to gather in many supporters and fans and is proving to be quite the competitor for other web browsers in the market.
Why is it so popular? To be honest, there are quite a few reasons, but one of the reasons is because it has a vast library of extensions and add-ons (these built-in applications enhance the browser’s ability to do what you want it to do).
Another reason is that Chrome uses a really clean and simple user interface, which makes is a joy to use. It also allows you to search straight from the address bar, which makes things so much simpler.
Google Chrome has become such a reliable and utterly consistent browser platform that it is almost as prevalent as Google itself, which is saying a lot. Constantly growing in popularity, it is already being named the number one browser, accountable for nearly 64 percent of all browser usage, according to StatCounter.
Out With the Old, In With the New
There is definitely no denying that Chrome has played an important role in internet history, and will continue to play a big role in the future. One of the really nifty things about Chrome is their regular updates. Whilst some may think these unnecessary, there is a compelling reason why they do this.
In light of the fact that so much is done online, and because there are so many enterprising and crafty hackers out there, having these updates from Chrome on a regular basis will ensure that your browser information and devices are kept safe with the latest security updates. It is also so that Google can fix any minor problems should there be any, as well as add improvements to help Chrome work even better than before.
Each update brings with it a newer and better version, which is why it is crucial to allow Chrome to update automatically. A new update is rolled out every six weeks or so. Currently, the last update was Chrome 87, with a new update due mid-January next year.
A Guide to Updating Chrome
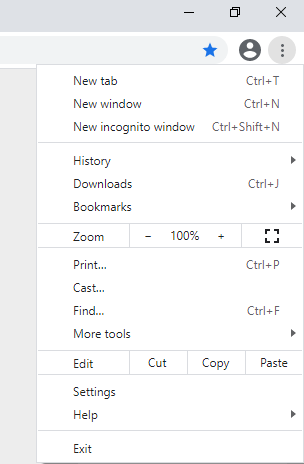
To see whether a new update for Chrome is available, open up your Chrome web browser. Then, click on the menu option in the top right-hand corner of the screen (depicted by the three little dots in a vertical line).
If an update is available, there will be an arrow which will appear in a colored circle, next to Update Google Chrome. The icon will be one of three colors – green, orange or red. If it is green then it means that an update has been pending for the past 48 hours.
If it is orange, then it means that the update has been ready to be installed for four days. When the icon is red, it means that the update has been available for installation for at least a week.
To update Chrome, simply click on the Update Google Chrome button. Once you have done that, all you have to do is restart your browser and the latest update will be in effect. If you had open tabs when you ran the update, they will automatically re-launch when Chrome starts up.
However, if you do not see the Update Google Chrome icon, then it is either because you are already using the latest version, or because the newest update has not become available for your device.
To see whether or not you are using the latest version, you can once again click on the menu option in the top right-hand corner of the screen (the one with the three little dots) and then hover over the Help button. This will open up a tab with more options. Click on the About Google Chrome tab.
This will open up the following screen:
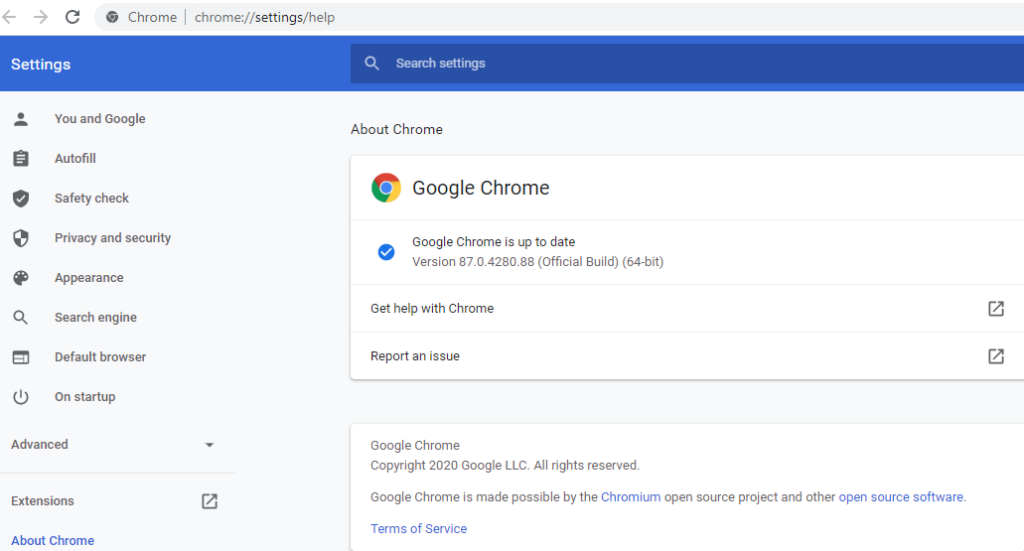
Google Chrome will then run a scan to see if you have the latest version installed. It will tell you exactly which version of Google Chrome you are running.
Updating Google Chrome On Mobile
Smart-phones being what they are, most users will have their applications automatically set to download new updates as they arrive, without them having to do anything. However, if you do not have your phone set to download updates automatically, you can rectify this by following a few simple steps.
If you are using an iPhone, go to your Settings, tap on the iTunes & App Store, then tap on App Updates and toggle it to the on position. You can also check manually whether or not you have any Chrome updates by going to the App Store, search for Chrome and then when it comes up, it will either have an Update or an Open button next to it.
If it says Open then you already have the latest version of Chrome running. However, if it says Update then it means that there is a newer version available. Simply click on the Update button and it will then update your Chrome to the latest version.
Android users will follow a similar process. Navigate to your Google Play Store and then tap on the menu button (this is depicted by the three horizontal lines in the top left-hand corner). Then tap on My Apps & Games.
If there is an Update button next to the Chrome icon, then tap on that to download and install the latest Chrome version. If it does not appear in the list, however, then it means that you already have the latest version running and you’re good to go.
Going Undercover
Google Chrome also offers a really cool and convenient tool that is perfect for when you want to shift into undetectable mode. It is called Incognito mode and it is exactly what you need if you want to browse sites undercover. Chrome will not store any of your site data, information you type into forms, cookies from websites or browsing history when in incognito mode.
To go into incognito mode, all you have to do is open Chrome and then click on the menu option in the top right-hand corner of the screen (depicted by the three little dots in a vertical line). Next, click on New Incognito Window and a new window will open up. In this window you can now browse free from prying eyes.
That being said, whilst browsing in incognito mode your activity may still be visible to websites you visit, or pages you sign into and, if you are using a local network, it will be visible to whomever runs the network.
If you have an incognito window open and running and then open another window from there, it will automatically open in incognito mode. To close and get out of incognito mode, simply close off all the browsing windows which you have opened whilst in this mode.
The Fundamental Truth
To sum up what has been stated above, the simple and fundamental truth is this…Google Chrome is, to put it simply, one of the greatest web browsers out there. It is by far the fastest browsing platform there is and this could be attributed to the fact that it is based on Webkit.
Its simplicity, speed and ease of use are all contributing factors as to why so many users prefer Google Chrome over any other web browser. Not to mention its quick and easy updates with delightfully comprehensive extensions and great add-ons.
Chrome also keeps you safe and secure by having built-in malware and phishing protection. Its browsing technology is safe and will give you a pop-up warning every time you are about to enter a website that is not secure or that is suspicious in any way.
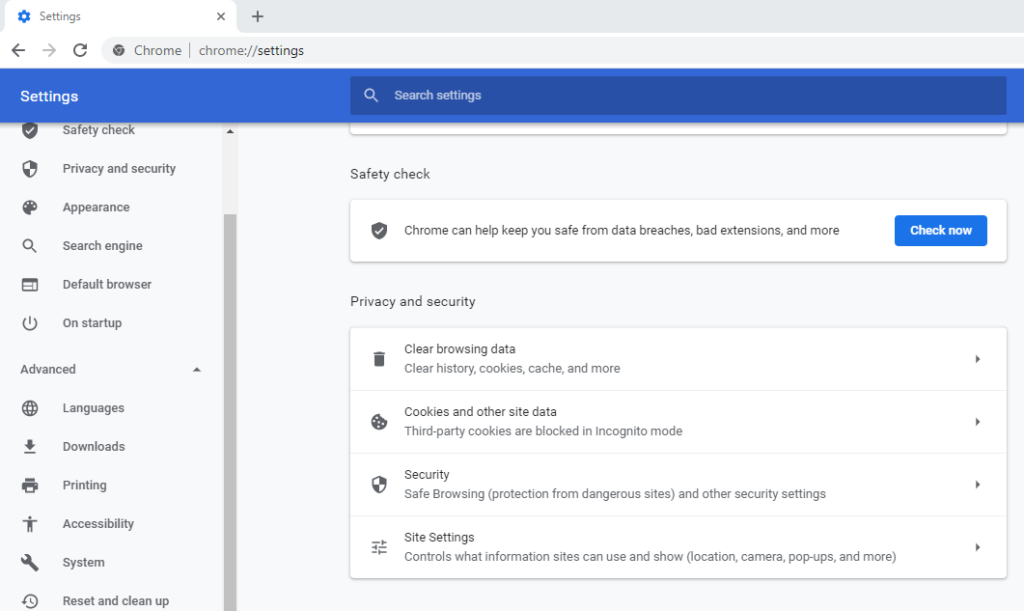
Chrome will run its malware program periodically, but if you would like to manually run a scan, here’s how to do it. Open Chrome and then click on the menu option in the top right-hand corner of the screen — depicted by the three little dots in a vertical line. Next click on Settings and then scroll down to the tab that says Advanced. Click on this and the following screen will pop up:
Then you will click on Reset and Clean Up, and then you need to click on Clean Up Computer.
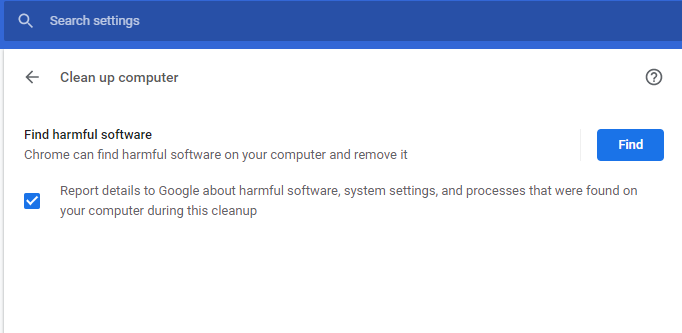
Once you have done that, click on Find and it will then start running the scan. If Chrome finds anything harmful, it will ask you to remove it, which you do by simply clicking on the Remove button.
As always, if you’re needing more information on Google Chrome and how to consistently update it, consider reaching out to HelpCloud Technicians for remote support.
