
Click to jump to your section:
- How to Screenshot on an iPhone
- How to Screenshot on an Android Phone
- How to Screenshot on a Mac
- How to Screenshot on a Windows Computer
- How to Screenshot on a Chromebook
A screenshot is an image taken by a user that shows the components of a screen. Although people normally think of screenshots in regard to iPhones and Androids, they can also be taken on Macs, Windows PCs and Chromebooks.
There are many reasons to take a screenshot.
For example, if you buy tickets online, you might want to capture the confirmation page after the transaction has gone through. Another common reason to take a screenshot is to record an error message and show it to computer technicians who provide remote support.
How to Take a Screenshot on an iPhone
Depending on your version of the iPhone, you will use a specific technique to screenshot. If you don’t know your iPhone model, you can find it in several ways. On your iPhone, go to “Settings,” “General” and “About.” Look for the heading titled “Model Number.”
Another option is to remove your SIM card tray and look for the model number on the port’s upper side. If you still can’t find the model number, it might be listed on the back of your device. After you’ve found your model number, you will compare it to an online list to figure out what iPhone version you have.
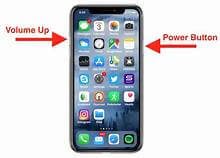
If you have an iPhone X, you do not have a home button. So, you press the volume up button as well as the power button at the same time to take a screenshot. The screen should flash and a camera capture sound will play if your volume on your phone is turned on and sound is enabled.
There is one other way to take a screenshot on iPhone X:
- Under “Settings” navigate to “General”
- and click “Accessibility.” Look for “AssistiveTouch”
- and then enable the feature.
- Next, select “Single Tap”
- and click “Screenshot.”
- From this point, if you want to take a screenshot, all you need to do is tap the floating “AssistiveTouch” icon once.
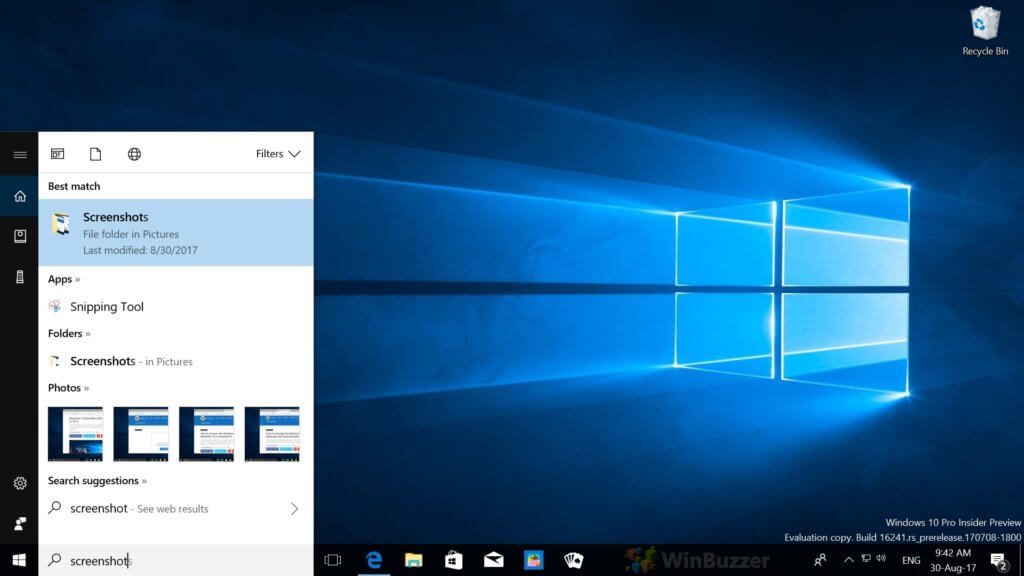
Regardless of the capture type you use, once you take a screenshot, it’ll go into your Photos app under “All Photos.” You can also look for your screenshots in the “Screenshots” album.
With iPhone X and a few other models, when you take a screenshot, a miniature display of your capture will populate. You can click on the thumbnail and quickly edit the screenshot. So, if one part is particularly important, you can circle it to highlight it, etc.
iPhone 6, 7 and 8 users all take screenshots the same way.
Start by pressing the side button and the Home button at the same time. After you press them briefly, quickly release both buttons at the same time. A thumbnail will then appear in the lower-left corner of your screen. To open the screenshot, tap the thumbnail. You can also swipe left to dismiss the pop-up window.
How to Take a Screenshot on an Android Device
First, make sure your Android is displaying the screen you want to capture. Then, you will press and hold the device’s Power button for several seconds. A menu should open, where you will press “Screenshot.”
If holding the Power button doesn’t work, you can also press and hold the Power and Volume down buttons simultaneously for several seconds; when you do this, your phone will capture and save a screenshot.

At the top of your Android, you should see your Screenshot capture shortly after you create the screenshot. If you don’t see this option, you can return to the Home screen.
To see your screenshot, swipe down from the top of your screen where it says “Screenshot captured” and tap “Screenshot saved.” To see every screenshot you’ve taken, open your Photos app, select “Menu,” hit “Device folders” and press “Screenshots.”
How to Take a Screenshot on a Mac
Taking screenshots on Mac is easy and customizable. To capture your entire screen, press the “Command,” “Shift” and “3” keys at the same time. If you want to select the region of the screenshot, press “command,” “Shift” and “4” at the same time and a selection box will appear.
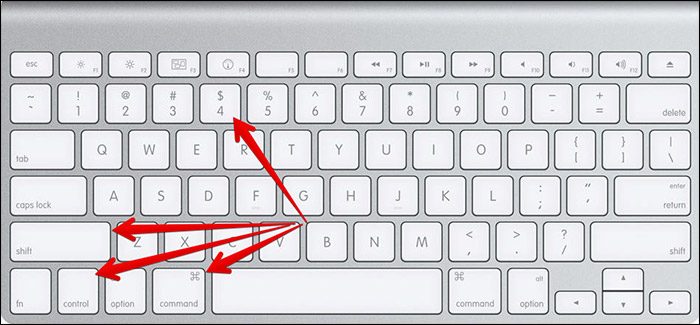
Another useful shortcut is “Command,” “Shift,” “3,” which takes a full-screen capture and saves it directly to the clipboard. After you take a screenshot, you will likely find it on your Mac desktop.
How to Take a Screenshot with a Windows PC
If you have Windows 10, the best way to take a screenshot is with Snip & Sketch. This new tool makes it easy to capture and share screenshots quickly. After you take a photo, you can also edit it within the application.
Snipping Tool is another option that some users swear by. You can use this program to take various types of screenshots, from custom selection to full-screen capture. A third common option is Print Screen. To screenshot your entire screen, press the “PrtScn” key. After this is done, your screenshot will save as a file and copy to the clipboard.
On some Windows devices, you can use physical buttons to take screenshots, too. Surface users can screenshot their entire screens by pressing and holding their volume down and Windows buttons at the same time.
How to Take a Screenshot with a Chromebook
There are several quick ways to take screenshots on Chromebooks.
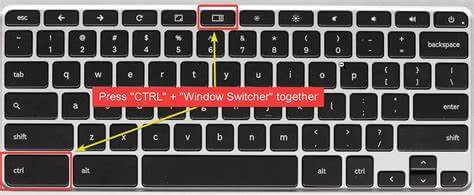
One way is to press and hold down the “Ctrl” key as well as the “Switch window key” at the same time; this results in a full screenshot. After you press these buttons together, a notification will alert you that you took a screenshot that’s yet to be saved. At first, all screenshots are stored in the “Downloads” folder, but you can save them wherever you choose.
Like other devices, Chromebook also has a setting that lets its users decide which parts of their screens they are going to share. To select a specific portion of your display, press and hold the “Ctrl” and “Shift” keys. After, hit the “Switch window” button. A cursor will let you select the part of the screen you want to share or save.
Applications and Innovations
Currently, Android’s share menu within Chrome is going through improvement. Although it is still in testing, there is a built-in screenshot tool in development that may soon be rolled out. The tool lets users capture and crop screenshots of webpages without needing to leave the Chrome app. There is also talk that there will be a scroll and capture option.
In addition, or in lieu of, using a built-in screenshot system, there are applications for this process. If you have Windows, Greenshot is a popular application. This app can be used to take photos of your full screen, a specific window or a selected area. Greenshot sends the images you’ve captured to your clipboard, so you can save them wherever you like.
If you want to edit screenshots on your Windows PC, a great app is PicPrick. Within this program, you can easily crop images, add text, annotate and more.
For Mac and Windows, Lightshot is a popular option. To take a screenshot, all you need to do is press the application’s shortcut, which is “Shift,” “cmd” and “9.” If you do not like this keyboard shortcut, you can also customize it within the application’s preferences. Another thing users enjoy about this program is that it has an option for direct cloud and social media upload.
Some Mac users utilize Monosnap, which has more functionality than a traditional screenshot application. You can use it to record your screen as well as to capture a moment in time. Screen recording is especially helpful if you’re trying to show someone how to do something or if you are in need of technical support.
If you’re a Windows user who is interested in screen recording, there are also options available. Windows 10 has a built-in screen recorder. Before you use this feature, it needs to be enabled. Open your “Settings” and click “Gaming,” “Game Bar” and “Record game clips, screenshots, and broadcasting using Game bar.”
To record, press “Windows” and “G.” The toolbar will then ask if you want to take a screenshot or capture a video. As soon as you choose screen recording, a video will begin. When you want recording to stop, press “Windows,” “Alt” and “R.”
To record with an app on Windows, VLC Media Player is a good choice. After the app is open, click “Media.” Next, click “Capture Device.” Under the “Capture mode” drop-down options, select “Desktop.”
At this point, click on the small down arrow located near the “Play” button and pick “Convert.” Then, select where you would like your screen captures to be saved. Here, you can also name your files. After working through these steps, you will click “Start” to begin screen recording. After you’re finished capturing, click on “Stop Playback” in the bottom left corner.
Chromebook users also have several options available to them. One popular download is the Awesome Screenshot App. With this tool, capturing your screen is simple. After you have a screenshot, you can drag and drop it into the app to annotate, too. One great feature about this app is that it includes an eraser, so you can easily conceal private information while still being able to share a screenshot.
Easier Than Ever
Whether you’re on your phone or computer, taking screenshots is an awesome feature that makes life so much easier. Developers know this, which is why many of today’s modern technologies come with screenshot options built-in. Additionally, if you want more functionality, there’s a variety of trust screenshot apps to choose from.
As always, if you are having any kind of difficulty with the taking of screenshots on any of the aforementioned systems and devices, please consider reaching out to HelpCloud Technicians for remote support.
