
Table of Contents:
- What is and How to Set Up a Wi-Fi Extender
- Identify the Dead Zones
- Location, location, location
- Areas to Avoid for Wi-Fi Extender
- Areas for Best Placement of Wi-Fi Extender
The year is 2020 and having a great Wi-Fi signal has become just about as crucial to most people as indoor plumbing or electricity. We need the internet for most activities such as working, studying, socializing and even, believe it or not, relaxing. There are apps for just about everything these days, and many of them (if not all of them) require the internet to function correctly.
In times gone by, we would use dial-up routers (or modems) to connect us to the internet, which would be excruciatingly slow, and many times would not work at all. Not to mention that we would only be able to connect one device via an ethernet cable. Today, however, we have a new kid on the block — Wi-Fi.
Wi-Fi allows us to connect remotely to the internet on our portable devices such as smartphones, tablets and laptops. Since Wi-Fi has become such an essential part of our lives, when we are faced with poor and sometimes even non-existent signal, it could leave us feeling frustrated and just a tad bit lost at best.
One remedy was to install a NETGEAR Wi-Fi range extender so that the Wi-Fi signal could reach all the different places in the home. But somehow, there are still dead zones — areas where the Wi-Fi signal just will not reach.
So how do we make sure that we do not ever have to face this issue? Are there steps that we can take to minimize the chances of bad signal or, at worst, no signal? Can we get rid of the dead zones so that we hit that beautiful signal perfection all throughout the house?
Definitely! To better understand how to achieve the best possible signal from your Wi-Fi extender, it helps to first understand how Wi-Fi works and what makes it tick … and not tick. We also have two posts about how to set up a Netgear Wi-Fi extender and the differences between a Wi-Fi repeater and extender. Our YouTube unboxing and reviews of the Netgear EX3700 can be found here and of the Linksys AC750 here.
What Is It?
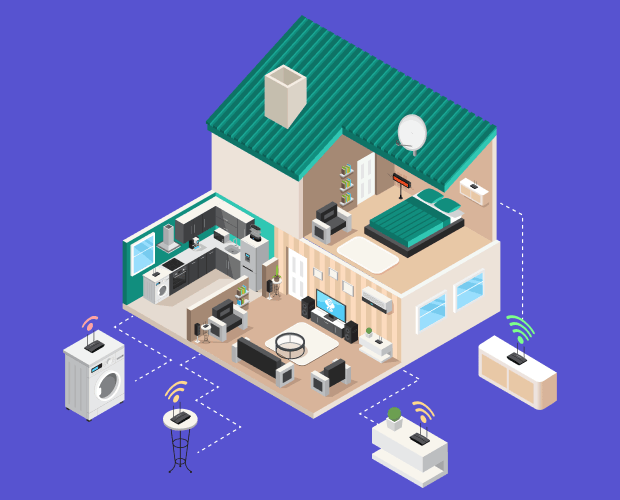
The most basic explanation of Wi-Fi is that it is a wireless network technology which allows all our smart devices such as laptops, smartphones, tablets and cameras and printers, to interface with the internet without being connected by cables.
Wi-Fi works using radio waves to send information using specific frequencies. The most typically used being the 2.4GHz and 5GHz range. The normal range for signal is roughly about 100 meters…in the open air, that is. Inside the house, however, this is not the case as there are walls and ceilings and all sorts of other things getting in the way of the signal, reflecting and disrupting it.
Other appliances such as microwaves, washing machines, dishwashers, televisions and so on are also part of the disruptive gang. All electronic household appliances emit electromagnetic waves and, whilst they do not play the biggest role, they do still contribute to interfering and interrupting the Wi-Fi signal enough so that it makes a difference. One other appliance that should be kept as far away as possible from the router and the Wi-Fi extender is a radiant heater.
When setting up the Wi-Fi extender, be sure to avoid these signal disruptors. Even baby monitors can absorb or interfere with your Wi-Fi signal, so you need to make sure that the extender and router are not set up anywhere near these culprits.
Another thing to keep in mind is that the router needs to be placed as high up as possible. Wi-Fi signals move outward in all directions (omni-directionally), both horizontally and diagonally. When placed near the floor, the signal has far more chance of being blocked by furniture and the ability to emit strong signals is severely limited.
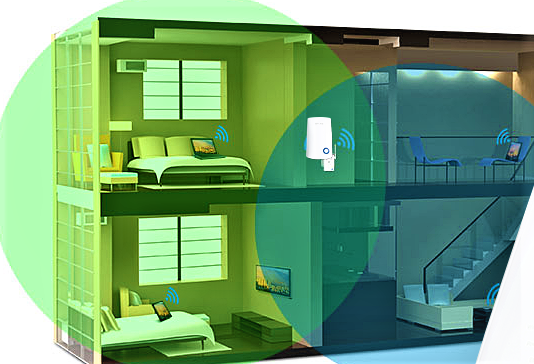
This goes for the Wi-Fi extender as well. The higher up it is, the better it will be able to catch and extend the signal from the router to all those little nooks and crannies that have become dead zones. Now that we have got that cleared up, it is necessary to sort out the dead zones.
Identify the Dead Zones
What is a dead zone? Simply put, it is an area in your home that is meant to be covered by the Wi-Fi signal, and yet the Wi-Fi does not work there. In reality, anything that can interfere or interrupt Wi-Fi frequency can create a dead zone.
When you are in a dead zone, you will not be able to connect to the Wi-Fi at all and your device will not pick up even a weak signal.
In effect, this is the simplest way in which to identify the wireless dead zones in your home. If you connect to your Wi-Fi and then walk slowly around your home, you will clearly be able to see where the signal is strongest and where it is weakest, up until the point where you hit the dead zone and lose all signal.
Once you have identified the dead zones, you can then tackle the task of moving your Wi-Fi extender to the location which will give you optimum signal in all areas of your home.
Location, Location, Location
As with so many things in life, it is all about location. If you have a single floor home, then there should not be too many hassles finding the perfect area to place your extender. However, if you have a duplex or a basement, then it gets a little tricky to make sure that you find that sweet spot for perfect Wi-Fi reception.
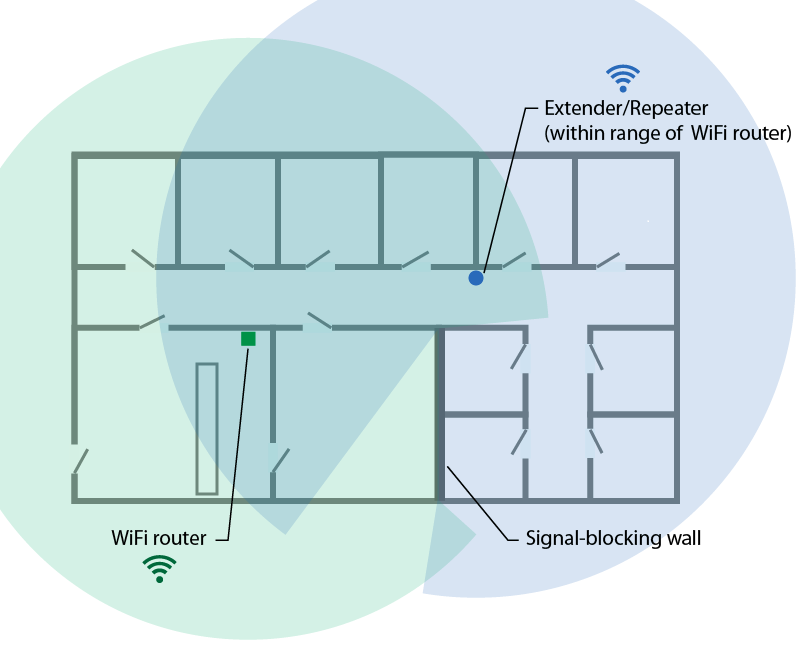
Keep in mind that when you place your extender, you will need to make sure to place it within range of the router. Check that there are not any concrete walls blocking the signal and you might also want to consider dedicating a power plug to the extender so that you do not need to unplug it to use the power source for other appliances etc.
For instance, you should try not to place your Wi-Fi extender around corners as the walls will block the signal from your router and thus the signal will be much weaker than if your extender had a clear line of sight to your router. If this cannot be avoided, it would be best if the extender were placed on the other side of a drywall instead of a concrete wall.
Something else that interferes with Wi-Fi signal are other Wi-Fi signals. This can be quite a challenge if you are living in an apartment building or in a row of townhouses. If this is the case, never fear, there is a simple way to check how many people are using the same Wi-Fi channel as yourself.
You can check how many people are using the same Wi-Fi channel as yourself by using a program called WiFiInfoView. It is a free tool which allows you to see which channel you are using on your Wi-Fi and if there are any other Wi-Fi connections using the same channel. If multiple wireless connections are competing to use the same channel, it will substantially slow down your connection speed and cause some problems.
A quick fix for this is to unplug your router, wait a few seconds and then plug it back in again. The router will automatically choose the best channel for you to be connected to.
The best area to install your router would be the center of your home, or as near it as possible. And then from there you will be able to determine the dead zones and where it would be best to place your NETGEAR Wi-Fi extender.
Placing the extender as high up as possible is also advised, so that it is away from water and throughway foot traffic. This will make sure that it does not have any unfortunate accidents and will continue to work as expected, being able to give you the maximum in Wi-Fi sweet spot connectivity.
To Summarize Things …
In conclusion, there are areas to avoid placing the extender and areas which would be beneficial to the signal should you choose to place your extender in those areas. We have summed them up below.
Areas to avoid for Wi-Fi Extender:
- Rooms lined with metal.
- Rooms with thick concrete walls.
- Areas close to metal surfaces and mirrors.
- Areas close to kitchen appliances and radiant heaters.
- Avoid placing it next to windows or near big bodies of water — such as fish tanks.
Areas for best placement of Wi-Fi Extender:
- At eye level or above.
- With a clear line of sight to the router.
- In an open area with minimum obstructions.
- Halfway between your router and the dead zone.
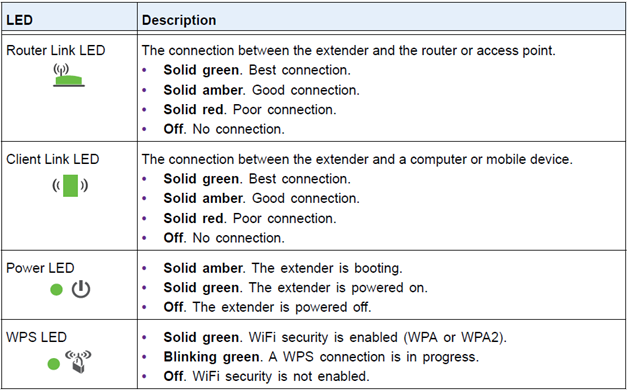
One other thing to keep in mind is that you can always check on the LED lights on your Wi-Fi extender to make sure it is getting optimum signal from the router.
If the lights on the extender are not green or amber, you may want to consider moving the router into a more central location, away from windows or signal blocking culprits.
Some people find that perfectly sweet Wi-Fi spot almost immediately, but sometimes you may need to search just a little longer. However, once you have found it, there is no looking back! No more waiting for movies to load, no more dead zones, no more irritating messages saying there is no signal.
You will have a great connection throughout your home and will be able to relax and watch the next episode of your favorite show without streaming interruptions or signal breaks. It certainly is well worth the effort!
As always, if you are having any kind of difficulty with the signal strength of your NETGEAR Wi-Fi extender, consider reaching out to HelpCloud Technicians for remote support to help resolve the issue.
