
Table of Contents:
- Delete any Apps that you Don’t Need
- Clear the Browser Cache
- Clear Out any Unwanted Music
- Delete Photos After Saving to the Cloud
- Delete Message Attachments
A lack of storage space on your iPhone (iOs) can become quite a common complaint in these digital times in which we live. It seems that we are always running out of space at the most crucial moment and the annoying reality is that you can’t upgrade internal storage space on an iPhone.
When you’re low on space, this will also really slow down the effective working of your iPhone and can cause a lot of frustration when apps don’t work like they’re supposed to.
So how does one rectify this problem? How can you adequately manage and clear space on your iPhone to ensure that you won’t be stuck with that constant reminder that you have run out of space?
To begin with, it would be a good idea to check what is currently taking up the storage space, that way you will have a better idea of what is taking up the most room and you will then be able to deal with the culprit more decisively and effectively.
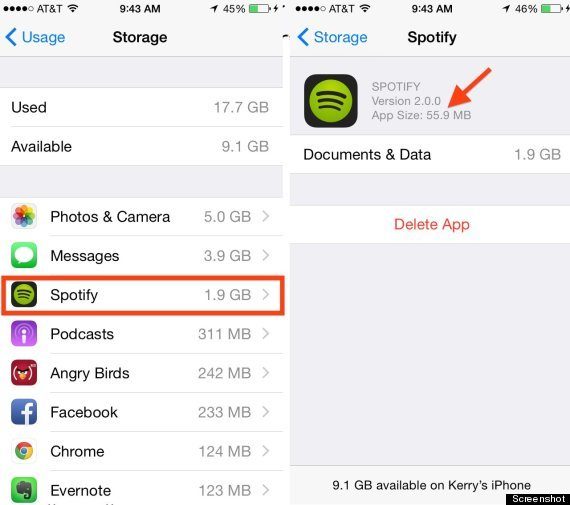
To do this, you need to open the Settings app. Then you go to General > Usage > Manage Storage.
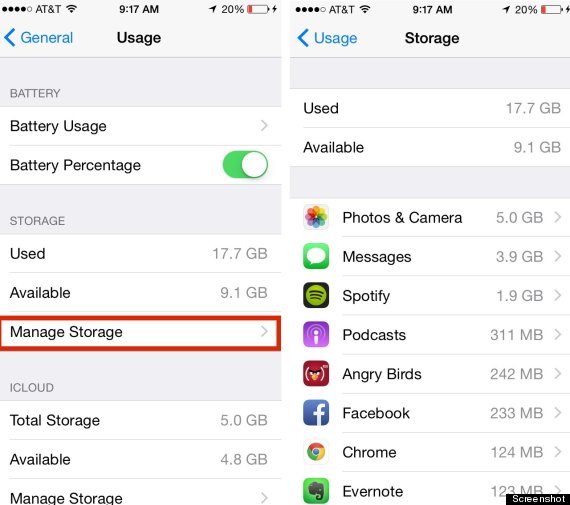
Here you will be able to see exactly which app is taking up what amount of space. Now that you know what is taking up the most space, you can begin to clear up storage space by following the few simple and effective steps outlined below.
1. Delete Any Apps That You Don’t Need
You’d be surprised how many apps you have on your phone which you just don’t need or even use. These often take up quite a lot of space and it is, therefore, the most obvious place to start cleaning up.
To delete an app that you no longer need or want, go into your iPhone Storage page (General > Usage > Manage Storage) and then tap on the app that you want to delete. It will give you an option to either delete the app or offload it. Tap on the delete button to completely delete the app and all of its data.
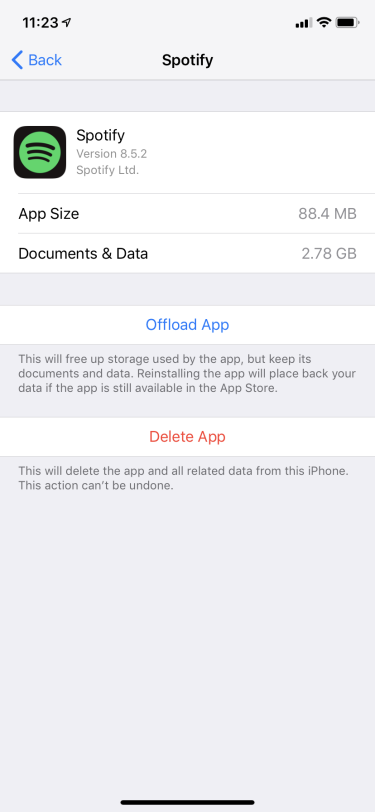
You can also choose to to offload an app instead of deleting it. This means that the app itself is removed from your phone, but all the data still remains so that if you want to reinstall the app at a later date, it will install with all of its former data.
To offload an app, go to Manage Storage and then tap on the app you would like to offload. This time, instead of tapping the delete button, you can select the Offload button instead.
2. Empty the Browser Cache
Browsing online via a smart phone has now become super easy. Along with all the browsing, though, comes the browsing history and cache. This can pile up pretty quickly and before you know it, your iPhone has run out of space. So, to make sure this doesn’t happen, it is advisable to clear out your browser cache regularly.
To clear out the cache, go to Settings, then tap on Safari. Scroll down and tap on Clear History and Website Data. Next, tap on Clear History and Data.
Next, you need to go back to Settings and Safari. Now scroll down until you get to Advanced. Tap on it and then tap on Website Data. And last but not least, tap the Remove All Website Data. Then tap Remove Now.
If you are using Chrome instead of Safari, then you will open up the Chrome app, tap the triple-dot button in the top right-hand corner. Next, tap on History. At the bottom of the screen tap on Clear Browsing Data.
Keep in mind that every time you use your web browser, it stores up unwanted data, so you will need to keep clearing this out, otherwise it will pile up.
3. Clear Out Any Unwanted Music
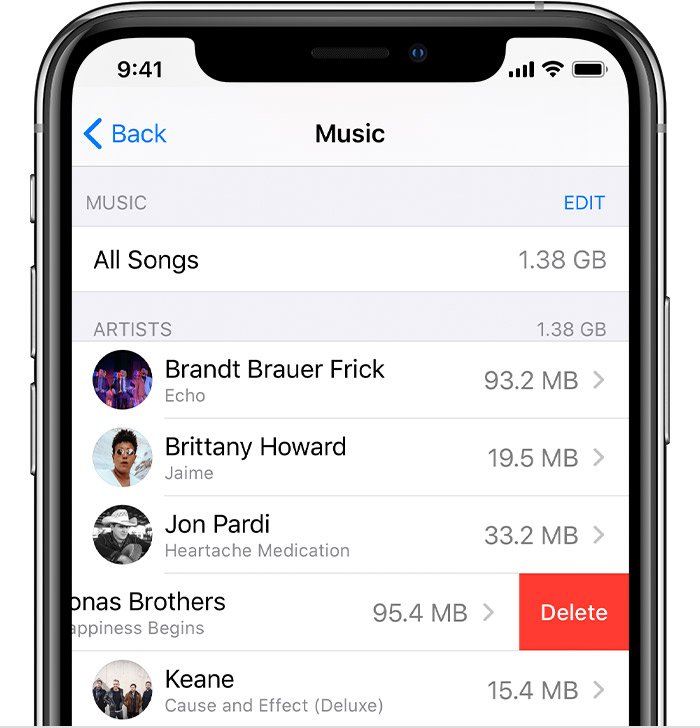
As fashion trends change and fads come and go, music always remains. However, your choice of music may change over time, and songs you liked a year ago may not be to your liking today. Unwanted music is another area which takes up quite a lot of space, so it is a good idea to clean out those unwanted songs on a regular basis.
Go to the Settings app. Tap on General and then tap iPhone Storage. Scroll down to Music and tap on it. This will open up a screen that shows you all the music you have on your iPhone. To delete a song, simply swipe left on any song, album, or artist.
You can also delete all the music on your phone. You can do this by swiping left on All Songs. Then tap Delete.
Once you have cleared out all those old and unwanted songs, you will be able to collect new songs to match your latest tastes.
4. Delete Photos After Saving to the Cloud
Photos are a wonderful way to keep all those memories close at hand. The only problem is that they do take up quite a lot of storage space. There are a few ways in which you can remedy this.
Firstly, you can save all your photos in the cloud. To do this you will need to make sure you are connected to a Wi-Fi network. Next, tap on Settings > iCloud > Backup.
If the iCloud Backup is not turned on, you will need to first turn it on before you can continue to backup your photos. Next, tap Backup Now.
You can also halve your photo library by going to Settings > Photos & Camera > Tap the Keep Normal Photo. Your iPhone keeps the normal photos as well as storing the same photo in an HDR (High Dynamic Range) version. This takes up twice the space so its a good idea to check this out if you need to free up some more space.
Another tip to keep in mind regarding photos is not to use Photo Stream. Unless you really need to share photos across all your devices, you should turn this option off as it also takes up a lot of space.
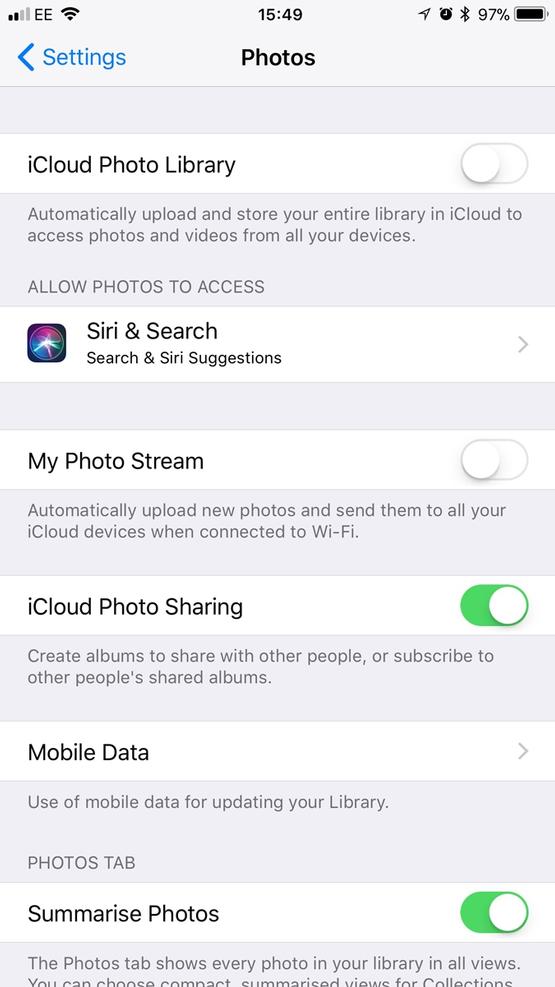
To disable this feature, go to Settings > Photos & Camera > Tap the Photo Stream button.
5. Delete Unwanted Message Attachments
Sending and receiving images via the Message app is another area that can end up being a real space hogger.
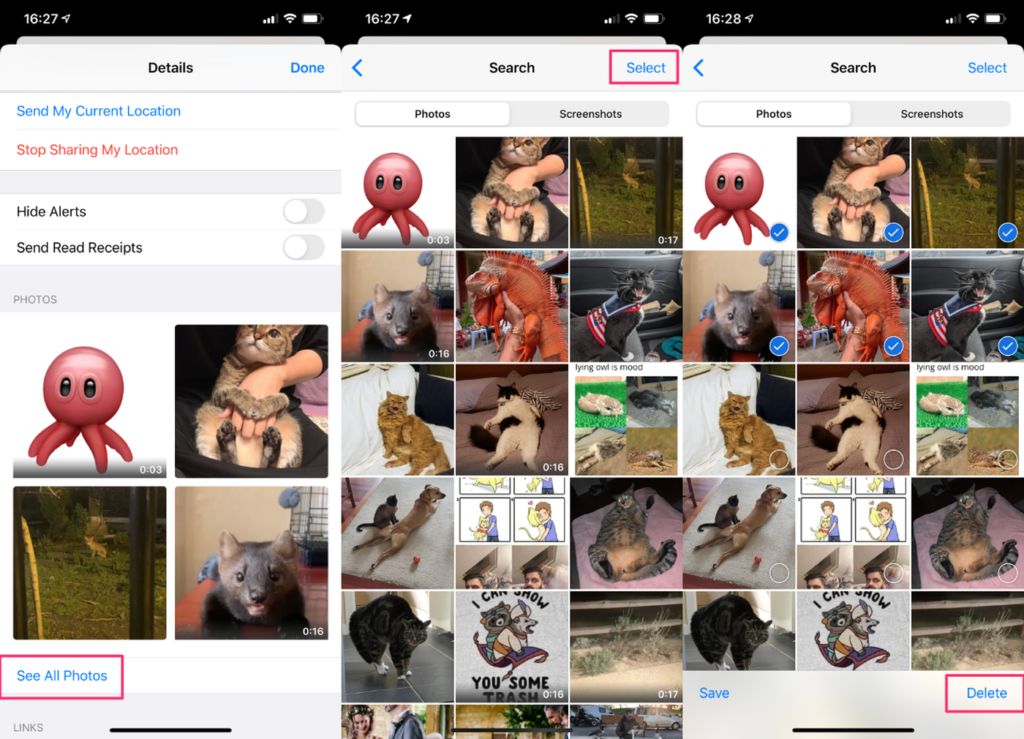
Open up your Messages app. Tap on one of the chats that you know has quite a lot of images. Then tap on the recipient’s name in the top center of the screen. Then tap Info. Scroll down to the bottom and tap on See All Photos. Next, tap on Select in the top right-hand corner and then select all the photos that you would like to delete and tap on the Delete button in the bottom right-hand corner of the screen.
WhatsApp is another messaging app that tends to store a ton of data due to images and photos etc. Happily, it is easy to remove unwanted data and clear space in a jiffy.
First, open WhatsApp on your phone. Tap on the Settings cog (it looks like a little wheel) in the bottom right-hand corner and then tap on Data and Storage Usage. Tap on Storage and you will then be able to see how much data each one of your chats is using. Select which of the chats you want to delete data from and then tap on Manage.
If you only want to delete certain of the data, you can un-tick everything except that which you want to remove and then tap Clear. Alternatively, you can remove it all by leaving everything ticked and tapping the Clear button.
Another tip to remember is that you can also set your messages to auto delete after a certain amount of time. Your iPhone offers a feature which will delete messages automatically after 30 days or even one year. To enable this feature, go to Settings and tap on Messages. Then tap on the Keep Messages tab and you can then select either the 30 days option or the one year option.
If you have messages which you would like to keep, you can always transfer them to your computer before deleting them.
The End Result
As you can see, there are numerous ways in which to free up some much-needed space. It is very easy to accumulate a lot of unwanted files, photos and even apps.
If that still doesn’t free up enough space for you, then you may need to look at investing in a Micro SD card which can go in your phone and will free up a lot of internal storage space.
At the end of the day, it is good to remember and apply the following: if you don’t need it, then delete it. Once you clear out all the space-hoggers, you will be able to enjoy faster and better performance from your iPhone.
As always, if you are having any kind of issue with the freeing up of more space on your iPhone, consider reaching out to HelpCloud Technicians for remote support.
