
With more users than cars around the globe, Google and Facebook are online giants.
Google has 2.5 billion users, and managing the information of all those users is no simple feat. When it comes to Facebook, one of the most famous social networking sites in the world, with 651,835,100 million active users, the service contains an inordinate amount of personal information.
Since Google and Facebook are experiencing unprecedented traffic, they’re writing the rules on large-scale information security. This is a big deal, because the information they keep can be highly personal. For example, if you have a Facebook or Google account, chances are these networks know your name, gender, hometown, interests, political viewpoints and more.
Google and Facebook collect information about you for a variety of reasons. One use is to create a profile about you; to do this, they often look at your information, compare it to other users and other sites and then construct a schema for your profile. This info can then be used to market products to you that you’re more likely to purchase.
In addition to having a general idea of who you are, Google and Facebook often track where you are. If your location tracking is enabled for both sites, each monitors data about where you like to go, where you live, where you work and more.
Sometimes, this information is helpful; Google may use it to show you a coupon for a restaurant you frequently visit. At other times, it can be scary; what if a criminal got ahold of your Google information and used it to tell when you weren’t home?
Regardless of your age or how often you use Google and Facebook, it’s important to know what information these sites have about you. Additionally, you may want to delete the stored data they’ve been gathering up to this point.
If this process proves to be too complicated then feel free to contact out professional technicians to get it done for you quick.
How to Access Your Information From Google
You can download a copy of what Google knows about you.
- Visit this webpage and select every box to make sure you have a comprehensive account of your information.
- Click “Next” and pick your file format. It’s generally easiest to pick the 50GB file so your information downloads in one file.
- You will also pick your delivery method, such as email or Google Drive.
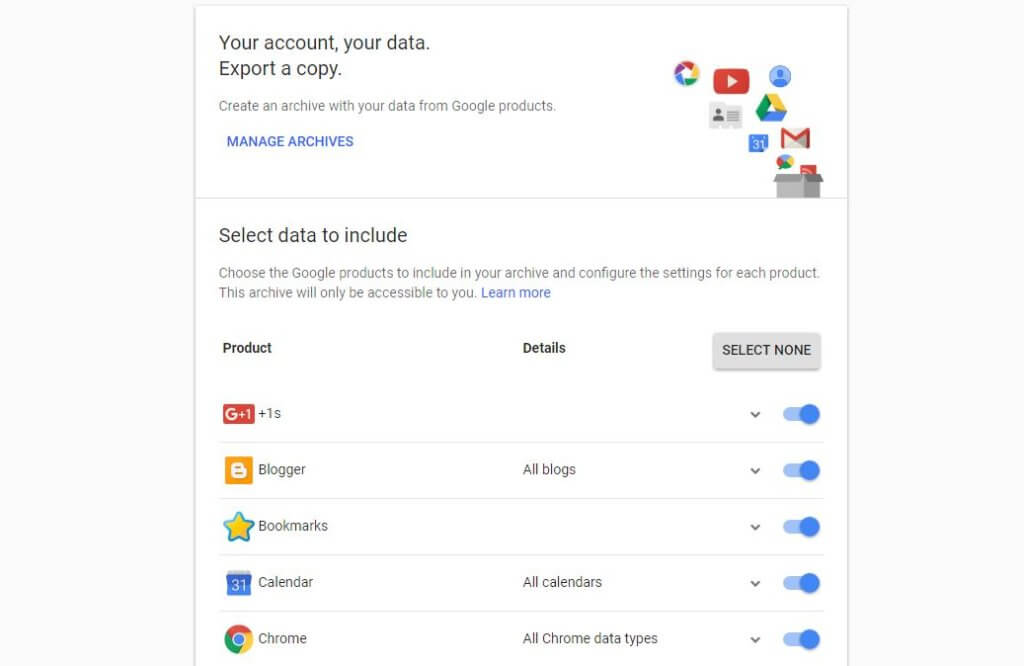
- Finally, click “Create Archive.”
- Google will then inform you that your download could take minutes, hours or even days.
- After the information is compiled, Google will send it to you and you can see all your data, photos, calendar information and more that Google has been saving.
How to Delete Your Information From Google
Google keeps private and public information about you. The public information it houses is available to anyone.
- To see this info, open your Google Account page within a web browser.
- Next, type your Google username and password in so you are signed into your account if it doesn’t automatically load.
- Once you’re logged in, you’ll see a menu bar. Click on this bar
- and select “Personal info.”
- Then, scroll to the bottom and look at the “Go to About me” section.
- Here, you can see all your public information. There is no way to make this info private, but you can make changes to it and erase it.
While you’re accessing your account,
- also visit the “Data & Personalization” section.
- Click “Activity controls” and “Web & App Activity.”
- Here, you can uncheck boxes to disable Google from tracking your image searches, online history, map application information, Google Assistant interactions and more.
Now, click “Manage Activity.” When you do this, Google will show you all of the information it’s collected about your activities. Deleting it now is a good idea, but the best approach is to make sure this info is deleted every few months. You can opt in for Google to delete your information automatically every three months or every 18 months.
After you’ve set up an auto-delete, make sure you know what data is being deleted. A pop-up message will display and you can choose whether you want information deleted or saved for various activities.
Also, it’s smart to review your Google location history:
- Under “Data & Personalization,”
- select “Activity controls” and “Location history.”
- At this point, you can turn off the toggle switch to stop Google from tracking your location.
- After this is done, select “Manage Activity.” You will see all of your location information that’s stored on Google.
Honestly, it’s pretty frightening to see the amount of information Google has about you, especially when it comes to your location. It’ll likely have a pretty comprehensive map and timeline that shows places you visit, the routes you take to get there and more.
To delete your location history, select the trash icon and confirm that you want to delete the location history when you are prompted. Next, select the gear icon and make sure Google is automatically deleting your location history.
Another thing to monitor while on your Google account is your YouTube history. You probably didn’t know that Google tracks your YouTube activity, many users have no idea. Within your Google Account, click “Web & App Activity.” If you don’t see this option, hit “Data & Personalization.” Then, click “Activity controls” and “YouTube History.”
You can turn off the toggle on this page so Google no longer tracks your YouTube searches. Make sure you also click “Manage Activity” and select to have your data deleted automatically on a timeframe you select, generally it’s smart to have it erased every couple months.
How to Access Your Information From Facebook
Facebook keeps a lot of information on you, and you can download it whenever you like.
- When you’re signed into your Facebook account, go to your settings.
- Click “Download a copy of your Facebook data”
- and “Download Archive.”
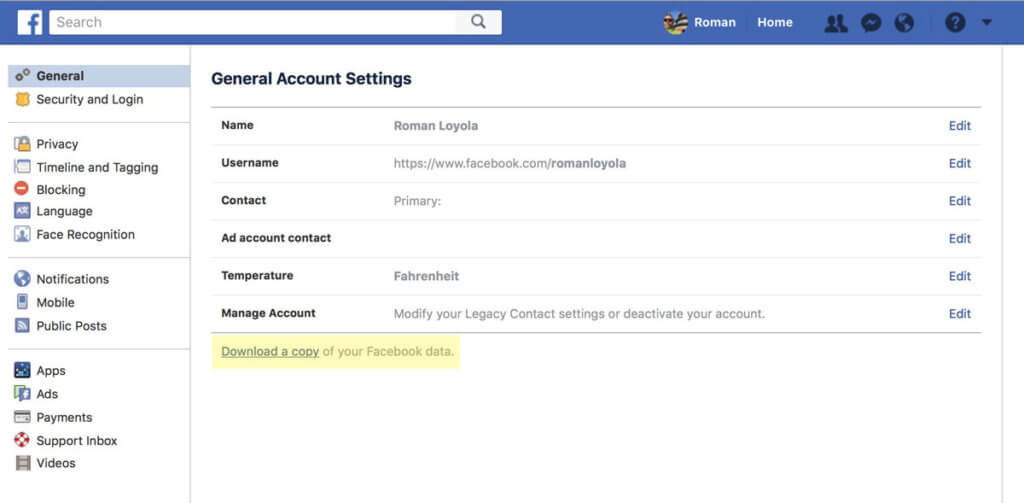
This generally takes a few minutes and is delivered to your computer in the form of a downloadable zip file. The zip file will have several folders within it that you can open individually.
How to Delete Your Information From Facebook
The only real way to delete what Facebook knows about you is to delete your account. If this is an option for you, navigate to this page and confirm that your account should be deleted.
Facebook will display an informational message about what happens if you delete your account. In general, it can take about three months for your info to officially be deleted. However, during this time, no other active users should be able to access your info.
If you want to keep using Facebook, make sure you limit the personal information it has about you. On a web browser, sign into Facebook and click on your name to view your profile. On your profile, select “About.”
Look at all of your information, like where you work, where you went to school, where you have lived, et cetera and delete any info you don’t want to be public. Keep in mind some fields, like birthday, can’t be deleted.
Next, create what Facebook calls a “Privacy Checkup.” To access this feature, on any Facebook page, select the icon of a question mark that’s at the top right of the screen. Facebook will then run you through various privacy issues, some of which are mentioned below in greater detail.
Another way to keep your info safe is to make sure Facebook’s partners aren’t accessing your data without you knowing. When you use Facebook to sign into another application, such as Yelp, the app is able to access info from your Facebook account.
Although it’s convenient to use Facebook to sign into other sites, you should have unique usernames and passwords for the sites you use. A password manager can help you manage this content so you don’t have to keep it all straight in your head.
To see what apps have access to your Facebook, go to your “Settings.” under “Apps and Websites,” look at all of the items that are associated with your account. Make sure to remove any you want to disable from having Facebook access.
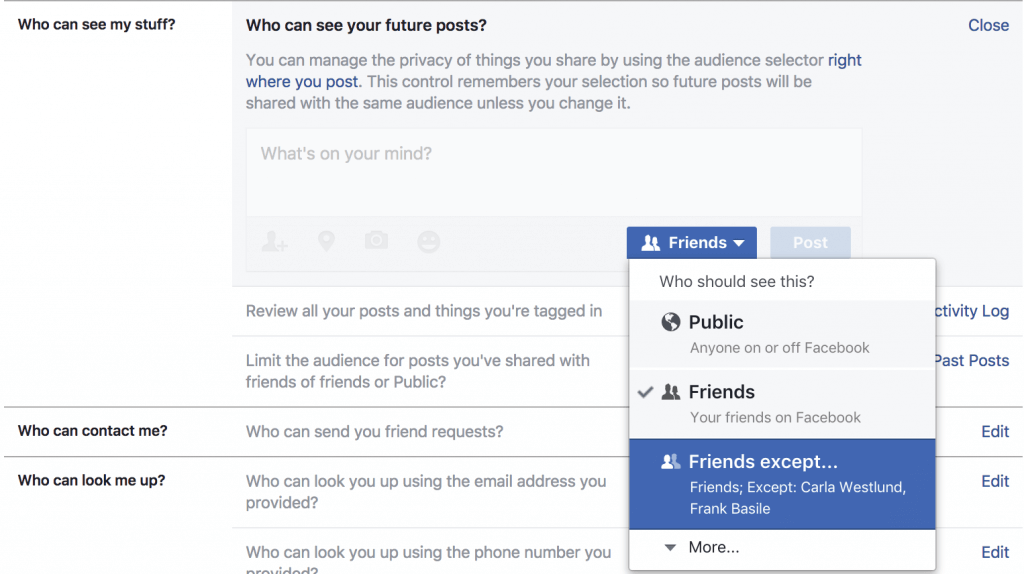
You can also manage who sees your posts to help you stay safe.
- Under “Settings” choose “Privacy.”
- Under “Your Activity,” look at “Who can see your future posts?”
- and select “Edit.”
- Review the drop-down menu and decide who can see your posts.
- It’s smart to make sure only your Facebook friends can see your posts. If they are public, any Facebook user can see what you’re putting online.
Another smart technique is to review your friend list and make sure the people you’re in contact with are actually people you know. If you’re not sure who someone is, it’s best to delete him or her from your profile.
Unfortunately, people do make fake accounts on Facebook and use them to steal from other users. So, if you don’t know someone, it’s best to deny his or her friend request as well as delete any current Facebook friends who you don’t actually know.
You can also use outside blocking tools to help keep your Facebook information safe. If you use Safari, Facebook is automatically blocked from using web trackers on other sites.
When Facebook uses web trackers, it can monitor your activity and gather information about how you interact with other websites. There are also extensions that are made to ensure Facebook doesn’t monitor you when you’re on third-party websites.
Making the Most of Things
Now that you know how to delete stored data and keep your information safer on Google and Facebook, you should be able to use these platforms with more peace of mind.
As always, if you are experiencing any kind of difficulty with the permanent deletion of your data on Google or Facebook, consider reaching out to HelpCloud Technicians for remote support.
