
Table of Contents
Progress is a wonderful thing and in the past few years we have seen a lot of it. We have progressed from rotary phones to mobile phones, from brick and mortar stores to online stores, and from pen and paper letters to emails.
These days, having an email account is of paramount importance. Email is fast and efficient and useful beyond description. We need it for everything from online schooling to online shopping. It is used by companies around the globe for a variety of purposes, including sending and receiving invoices as well as statements. This is especially true for the banking sector.
Emails are especially useful in being able to keep in touch with friends and loved ones. Our email address is required whenever we want to sign up for newsletters or even to log in to certain websites online.
When signing up for a new email account, one of the things we look for is ease of use, ease of access and also enough space so that we won’t constantly get notifications alerting us to the fact that our email server is full and we need to clear it out. With Gmail, we get all that and more! Gmail has been rated as among the top free email providers in the world.
With just the one account you are able to have access to a host of different platforms without needing a different username and password for each one. Google is also very serious about its security so you can be sure that your Gmail account will be safe and secure.
Another benefit of having a Gmail account is that you can access it from anywhere by simply logging into your account from any web browser (including from any mobile device).
Oh yes, and best of all … its free! So in this article we are going to go through how to create a new Gmail account and how to become well versed in using it.
Step #1: Create an Account
To get started, the first thing to do is to open the web browser of your preference and type in www.gmail.com. This will then open up the following window:
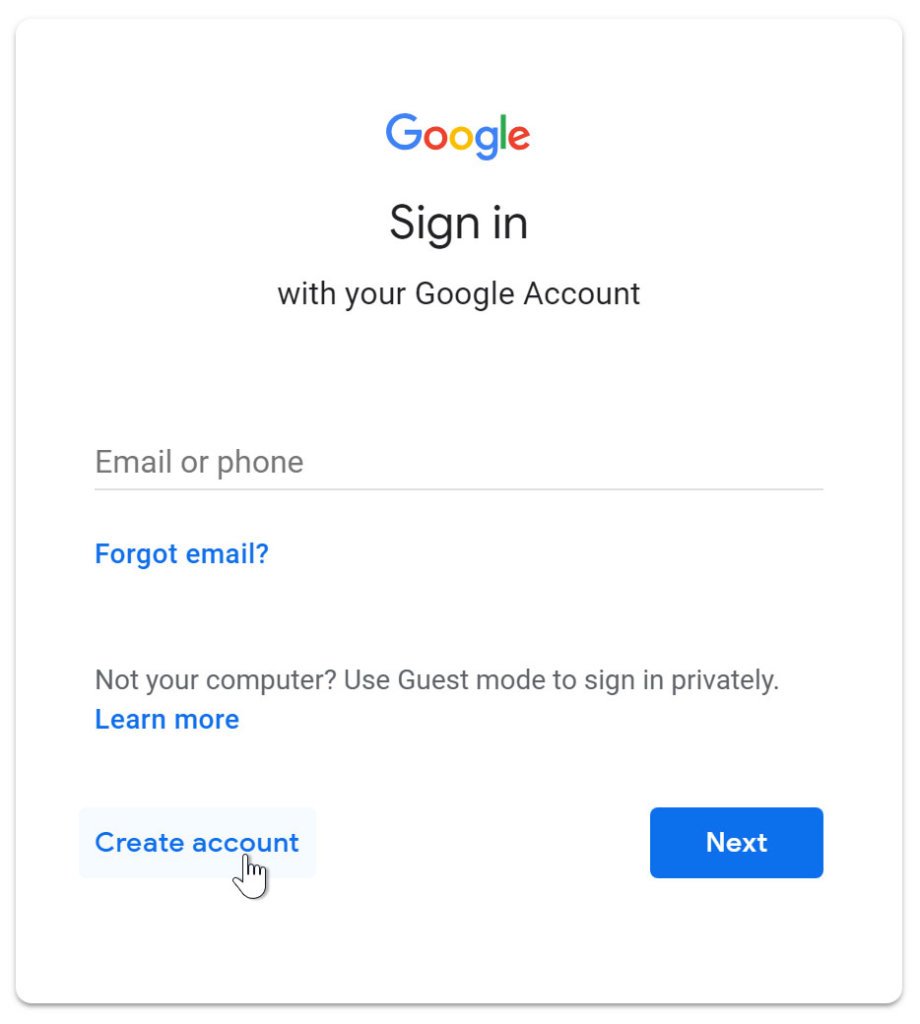
Left click on the Create Account button. A page will open up and it will have a sign in form that needs to be filled out. You will be asked to enter your name and surname, and then you need to create a Gmail username. This needs to be something that you will remember but it also needs to be something that has not been used before.
You will see that if the username you want to use has already been used before, a message will appear underneath the username box in red. It will tell you that the username has already been taken and then it will give you a few options of usernames that are available. It is best to rather create your own username unless one of those suggested is one that you will remember.
Generally a combination of letters, numbers and symbols is required to create a more secure username. The same applies to the password. That being said, it is best to create a strong password that you will be able to remember, as it isn’t the safest option to write down your username and password.
Once you have decided on your username and password and typed them in, you will then be asked to confirm your password. Retype your password in the box provided and then click next. You will now be asked to enter your mobile number to verify your account. Gmail uses a two step verification process as a safety precaution.
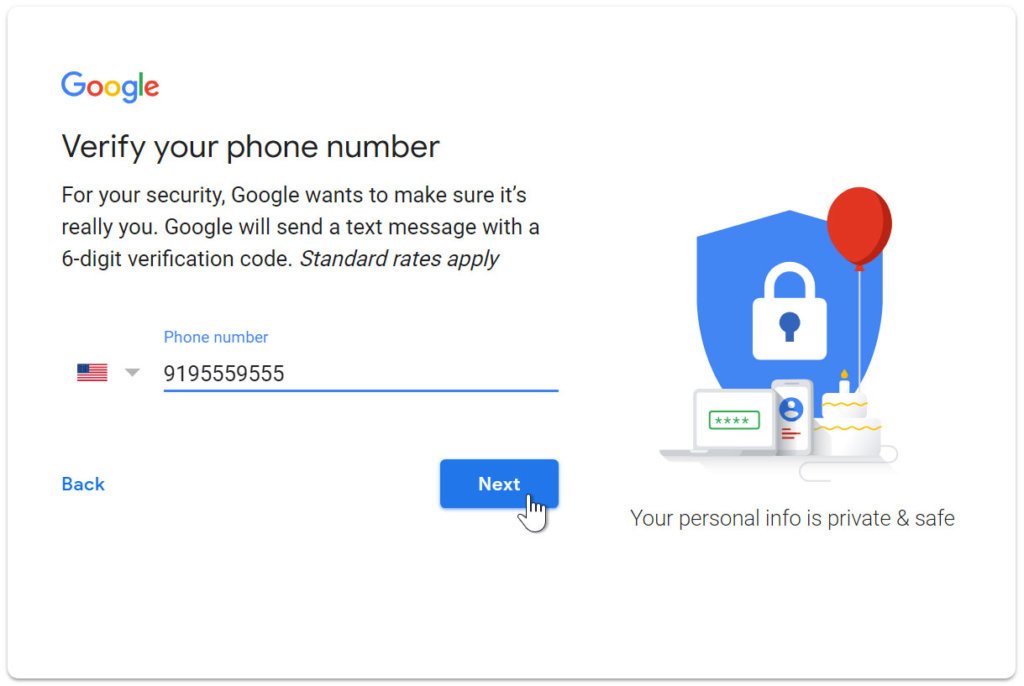
Once you have entered your mobile number, click on the Next button. Google will then send you a text message with a verification code. You need to type this code where it says Enter Verification Code and then left click on Next.
You will now be asked to enter a few more details, such as your birth date and gender. There is also an option to type in a recovery email address. In the event that you forget your password and cannot get into your Gmail account, Google will then send you a password recovery email to your secondary/recovery email address.
Once you have entered the information, click on Next. A window will appear asking you to review Google’s Terms of Service and Privacy Policy. Once you have gone through it, left click on the I Agree button.
Once you have done that, you will now be automatically signed in to your Gmail Account and will be redirected to the Gmail account homepage.
In the top right hand corner of the home screen, if you click on the Google Apps icon (pictured by nine little dots in a square) you will then be able to see a whole list of all the different platforms which you have access to, from Google Search, Google Play Store and Google Maps to your Google Drive and Google Calendar and Contacts as well.
Step #2: Ease of Use
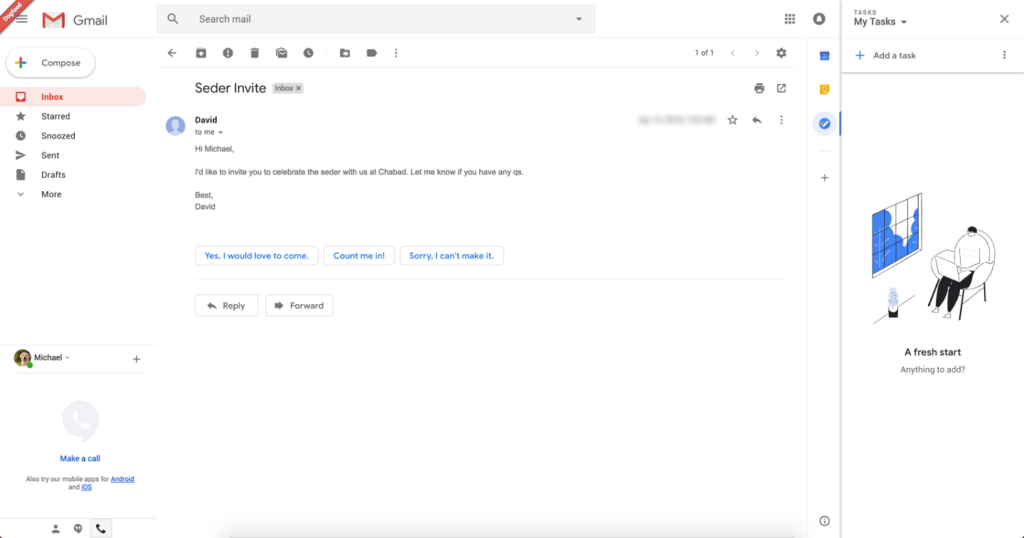
Now that your email account has been set up, let’s take a quick look at how to compose and send an email to somebody.
On the Gmail homepage (as per Image #3), you will see a button in the top left hand corner that says Compose. Left click on this button. It will then open up a window on the right-hand side of your screen.
To maximize the message screen, you can left click on the Maximize icon in the top right hand side of the message screen (this icon looks like two diagonal arrows). This will then make your message screen bigger.
Next you can then start your new email by filling out the To field. This is where you will type in the email address of the person to whom you are sending the email. Double check the email address once you have put it in because it needs to be exactly right otherwise the email will not be able to be delivered.
Once you have typed in the email address, you can then click on the Subject line and type in the subject of your email. There is one thing to be aware of when typing in the subject of the email, typing in an unprofessional subject line or even leaving it blank could get it filtered through to the recipient’s Spam folder.
The next step is to write the body of your email. There is no limit to how long or short an email needs to be, so it’s up to you what you put in there. You will notice that on the bottom of the message screen, there are a few icons. You can format the body of your email by using the formatting options provided under the formatting icon (an A that is underlined).
To apply formatting to any part of the text in the body of your email, simply left click at the beginning and then drag the cursor to the end of the part of text to which you would like to apply a formatting option. Then select the kind of format you would like from the options provided under the formatting icon.
Once you have completed your email, you can then left click on the Send button which is located in the lower left hand corner of the New Message box.
If you don’t want to send the email immediately, you can click on the little x in the top right hand corner of the message box and your message will then be automatically saved to the Drafts box.
You can then go back and finish the email at a time that is convenient to you by clicking on the Drafts box on the left hand side of your screen, and then clicking on the email to continue editing it, before you click on the Send button on the bottom left hand corner of your message screen.
Alternatively, should you wish to discard the email, you can click on the little trash can icon in the bottom right hand corner of the message screen. This will then delete your email from the Drafts box.
Step #3: Recovery and Confidence
As stated previously, Gmail is one of the easiest email platforms to use. Once you get know the basics, it isn’t difficult to figure out the rest and soon become extremely well versed in all the different options available when composing and sending emails.
So what happens if you forget your login details for your Gmail account? Don’t stress! Remember that in the first steps of setting up an account, there was a portion where you needed to fill in a secondary email account and/or a mobile number. It is for this very reason that you needed to have that filled out.
To recover your Password, simply navigate to the web browser of your choice, type in www.gmail.com, and then type in your Username and click on Next. Next, click on Forgot Password? This will take you to the Account Help page where you will be asked a few questions and given step by step directions on how to retrieve your Password or create a new one.
Another way to retrieve your account is to input your mobile number which you used when creating your Gmail account. Then click on Next. Google will then send you a verification code via text message to the mobile number you provided. Once you receive this code, type it into the block provided and then click on Next.
The same basic steps apply when using a recovery email address. The great thing about Gmail is the handy way in which everything is done through a step by step process. This makes it very easy to follow and understand, so there should be no difficulty in completing the recovery process.
As always, if you’re needing more information on how to better set up, understand or use your Gmail account with confidence, consider reaching out to HelpCloud Technicians for remote support.
