GMX mail is a free web based email service provided by 1&1 Mail and Media GmbH. It is designed for personal and small business users.
In addition to standard email services, GMX offers some interesting and generous benefits including:
- Unlimited storage, store as many emails and attachments as you need with no limit and free of charge.
- Attachments up to 50MB, this is one of the largest allowances from any of the free email providers and means you can attach files and images without compression.
- GMX Mail Collector, this allows you to link other web based email services like Gmail to you GMX account so you can store and read all of your mail in one, convenient location.
- Antivirus and Spam filters, these are particularly strong and GMX claims up to 98% of spam is blocked.
- Online Calendar, a free tool that allows you to organize your appointments and tasks.
Because GMX is a web based mail service you can access it on just about any platform or device. GMX also offers POP and IMAP services, though these are switched off by default and must be configured after you register. There are also GMX mail apps for the usual range of mobile devices.
GMX also offers extensive mail import facilities, so if you link another of your mail accounts from a different provider it is a simple process to import all your existing messages from that address into GMX.

How to Create Your Free GMX Email Account
Creating your new GMX email account is a simple process. You will need access to a web browser and, preferably, another email account with a different provider so you can receive password reset instructions should you ever forget your GMX account login details.
You will not need a mobile phone to register with GMX.
To begin, go to the GMX home page at https://www.gmx.com/.
At the top right of the home page click the Sign Up button.
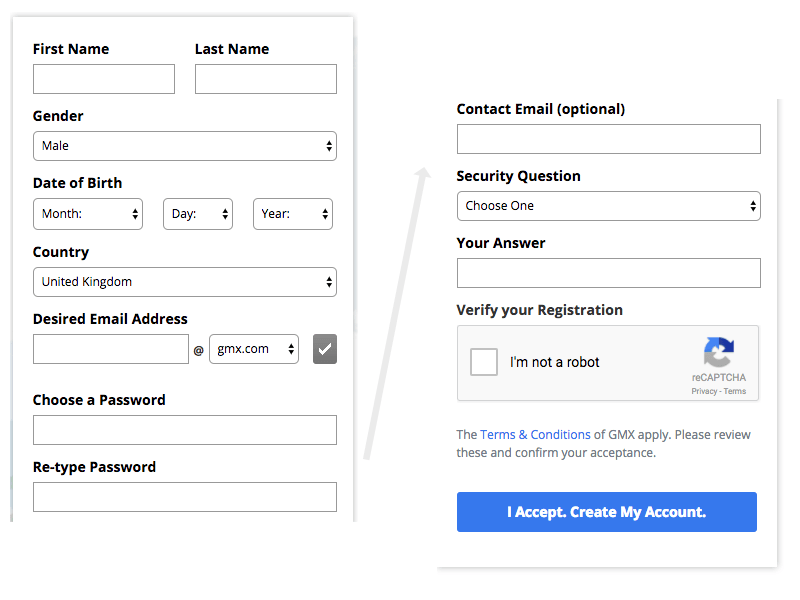
Now you will need to provide a few personal details and choose your new GMX email address.
Type in Your First Name and Last Name.
Next select your Gender, Date of Birth and Country from the drop down lists. If you are in the United States you will also be asked to select your State.
Now you need to choose your desired email address.
Type in the first part of the address you want. This is effectively your username and can be anything, for example, your name, your nickname. If you are going to be using your new email address for general purposes, including business usage, choose an appropriate address that isn’t going to embarrass, offend or make you appear unprofessional. In most cases your name works best, or your first name and last name separated by a dot (period), for example, john.smith@gmx.com. You can choose either a @gmx.com or @gmx.us mail domain from the drop down list, @gmx.com is selected by default and is fine for most purposes.
Click the arrow icon next to the email username and domain boxes. This checks that your chosen email address is available and hasn’t already been selected by another user. GMX has many members, sometimes email addresses with more common names are already taken and you have to choose an alternative. If your chosen address is unavailable, possible alternatives are suggested and if one of these is suitable go ahead and select it. If not, you can try typing your own variations into the email box until you find an address that’s free.
Next choose a password and type that in, then type it in again as confirmation. It is vital to select a strong password that can’t be guessed or cracked easily. You’ll see a list of password requirements displayed once you start typing in your password. The password should be at least 8 characters in length, a mix of lower case and upper case letters and numbers and containing at least one symbol, or special character. For more information on why it is so important to use strong passwords and how you can easily use and remember secure passwords for all your accounts, see our Password Guide.
Optionally you can provide a Contact Email address, if you already have another account with a different provider. It is a good idea to provide this as GMX will use it to send you password reset help and instructions should you ever forget your login details.
If you don’t provide an alternative email address then you’ll need to provide the answer to a security question to prove your identity should you ever need to recover your account details. Go ahead and select a Security Question from the drop down list and then type in the answer to this question.
Next you might see a request to tick a box, to prove you are a real person and not a robot. Go ahead and tick this CAPTCHA box.
Finally, read the terms and conditions if you wish to and then click the I Accept, Create My Account button.
If you have completed all the required information and there are no errors you will now see a welcome screen that gives you details about your new account and email address. There’s a button you can click to print this information for later reference, which is a good idea as it contains your unique Customer Number.
Click Continue to Inbox to start using your new GMX email account.
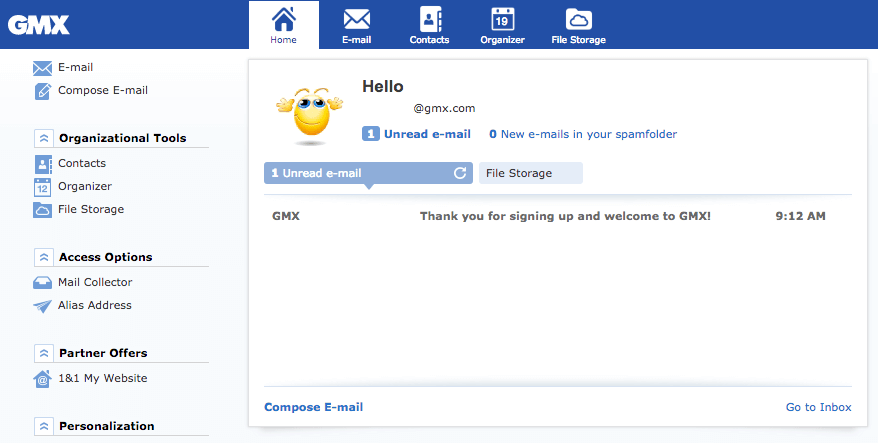
The first email in your inbox will be a welcome message, have a quick read of this for information on how to use the various facilities that come with your account. A copy of this email will also be sent to your contact email address if you provided one.
GMX Login – How to Access Your Email Inbox
Once you have a new account, it’s very quick and easy to login to your GMX inbox.
To begin, go to the GMX home page at https://www.gmx.com/.
At the top right of the home page click the Log In button.
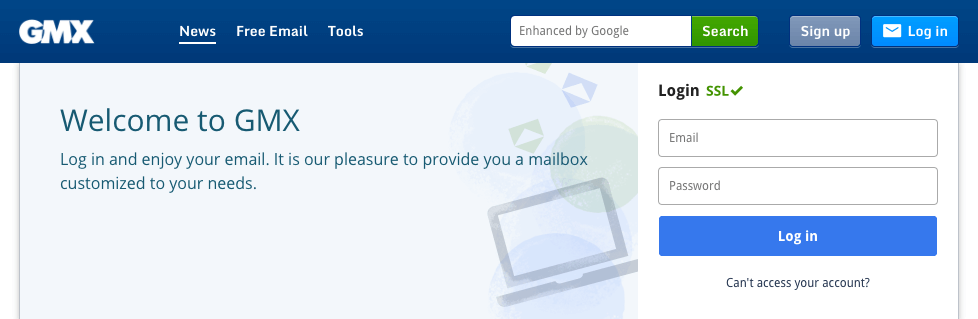
Type in your GMX email address and your password.
Click the Log In button.
This will take you straight to your inbox.
How to Configure and Use the GMX Mail Collector
The GMX Mail Collector is a great way to manage all your email accounts from one location. To connect your other email accounts to your GMX account is simple.
Login to your GMX inbox.
In the main menu to the left of the screen click the Settings option.
Now click the Mail Collector option.
You will see a short form that allows you to add your additional email addresses.
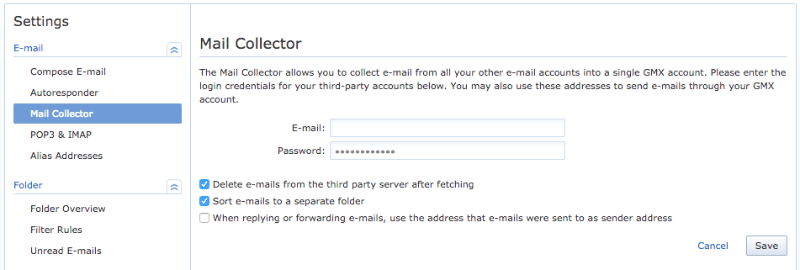
For each address you want to add, type in the Email Address and the Password.
Next you can choose how you want the mail collector to interact with your external email accounts.
If you would like to transfer email to your GMX account and the delete the original email message from the inbox on the other account, make sure the box labelled “Delete e-mails from the third party server after fetching” is ticked.
If you would like to keep email you transfer from other accounts in separate folders, rather than have all your email from all accounts combined into your main inbox, make sure the box labelled “Sort e-mails to a separate folder” is ticked.
When replying to email that has been copied from another email address to your GMX account, if you want to send a reply and have it appear as if the reply was sent by the original address, tick the box labelled “When replying or forwarding e-mails, use the address that emails were sent to as the sender address”.
Now click the Save button to link this email address with your GMX account. The GMX Mail Collector will now start copying your messages from the linked account to your GMX inbox, into a separate folder if you selected that option. It may take a little while for this process to complete, if there are a lot of messages to copy.
Repeat the process to add more of your email addresses.
When finished, you can now use your GMX account to check all your email in one place.
Login Problems – Using the GMX Password Recovery Assistant
If you forget your GMX email password you can reset it using the password recovery assistant.
To begin, go to the GMX home page and click the Log In button at the top right of the screen as normal.
Beneath the login form click the link labelled “Can’t Access Your Account?”.
This brings you to the GMX Help Center. Here you can find solutions to all the common login problems. You can either type keywords that describe your problem into the search box at the top of the page, or you can browse through the category list of solutions.
If you have forgotten your password, click on the first category in the help list titled “Forgot your Password?”.
This will bring you to the password recovery assistant that will allow you to automatically change (reset) your password.
To begin, type in your GMX Mail email address.
Next type the random letters in the Verification box to prove you are a genuine user and not a robot.
Now click the Continue button.
If you set up an alternative or contact email address during registration, select the option to have your password reset instructions sent by email. When the email arrives, follow the instructions inside. Click the link contained in the email.
If you did not provide an alternative email address then continue by selecting the Security Question option. Type in your answer to the security question and click Submit.
Whichever option you choose will bring you to a page in your web browser that allows you to change your password.
Type in your new password and then enter it again for confirmation.
All the usual rules apply for creating a strong password. Use our Password Guide for information on creating strong passwords and efficient and simple ways to remember all your passwords.
Click the Save New Password button. This will change your password and you can go ahead and use your new credentials to login to your inbox.
At the time of writing, the Password Recovery Assistant is not operational. Instead, a customer support form is displayed to allow you to send a support request. GMX recently changed their web site so this might be a temporary arrangement while the automated procedure is updated.
Useful Links
- GMX Login – Sign up for email or access you GMX email inbox.
- About the GMX Mail Collector – Combine all your email accounts for easier management.
- GMX Help Center – Search, help categories and FAQs.
- Forgot Password Help – Reset your password.
