
Terence Conran, an English designer, businessman and restaurateur, once said, “A room full of unnecessary clutter is not pleasant to sit in, so clear it of everything. When you fill it again, be ruthlessly selective about what goes back in. Your quality of life will be much improved.”
For many, this quote rings true. Working in a decluttered, organized space is generally far superior to any other working environment. Why, then, do people let their workspaces, both on their desktops as well as in real life, become so disorganized?
This question may truly never be answered, but that doesn’t mean you can’t clean up your computer to give yourself a more tidy workspace. With a little work and a file organization system, you can clean up your Mac in little to no time.
Utilize Home Folder
Before getting started, it’s important that you learn what home folder can do. When you’re on your desktop, you can use the shortcut “Shift+Command+H” to launch this folder.
Overall, this folder is one of the most important ones you’ll use on your Mac. Depending on how much information you want to save on your computer, you might even be able to store all of your data in your home folder.
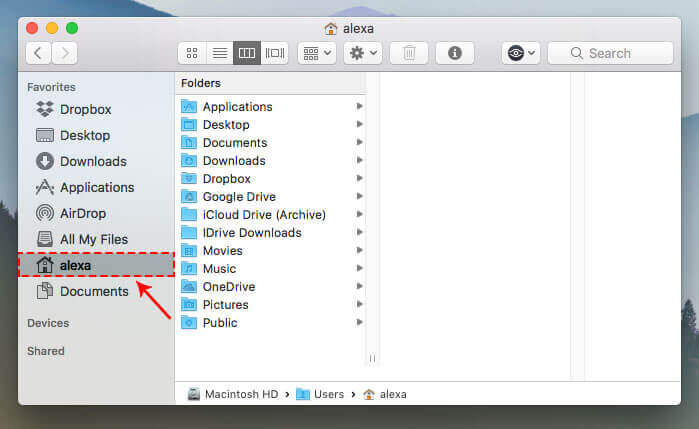
After you use the shortcut above, a new window should open. At the top of this window, you’ll see your username and a search bar. You’ll also notice that your folder has several folders inside of it already, even if you’re on a new computer for the first time.
By default, Mac puts options like “Desktop,” “Documents,” “Library” and “Public” in your home folder. Although you might not like all of its contents, it’s best to not rename or move files within your home folder. The items in this area have special uses that are necessary for your computer to work properly.
If you’re using your computer to save files, downloads, pictures, music, movies, documents and public files, your home folder is ready for your use. However, if you want to do more than these things on your computer, you’ll need to create folders in your home folder.
Creating, Structuring and Managing Files and Folders
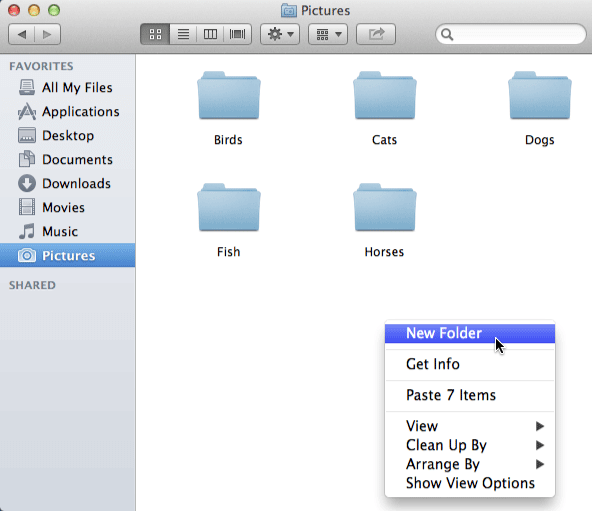
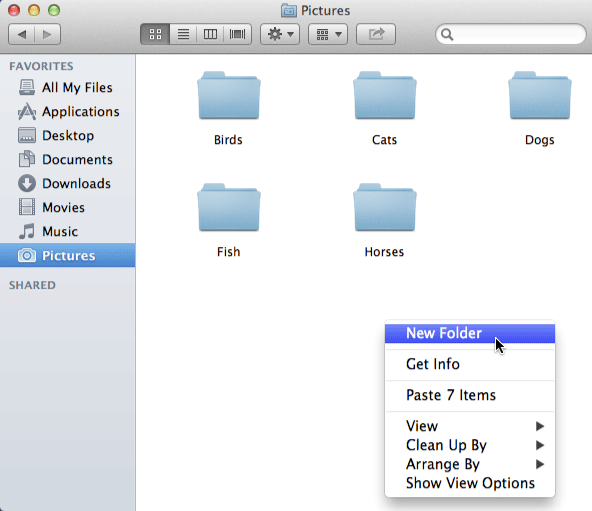
To create a folder, first, make sure you’re in the area where you want the folder to populate.
For example, if you want a new folder on your desktop, you’ll need to have your desktop loaded; if you want to add a folder in your home folder, its window will need to be up and running.
Once you’re in the proper place, click “File” at the top of your screen followed by “New Folder.” Another option is to hold down the keys “Shift+Command+N” at the same time. A new folder will come up, and then you can edit its name and click enter to save.
To move folders, files or other items into your new folder, you have a few options. The first is to simply drag the item of interest into the folder. The second is to select multiple items at once and then drag them all into the folder. Lastly, you can choose to save the item into the folder of your choice.
To keep an original copy of a folder unchanged, you can press and hold the “Option” key, then drag the item into the folder. If you do this, your item will stay in its original format and original location and a copy of it will be placed in your new folder.
Clean the Dock
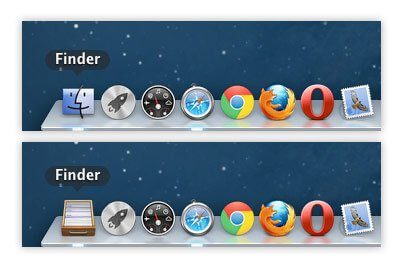
When you get your Mac, it will have items preloaded on its dock. Your dock is simply the translucent bar that’s at the bottom of your computer screen. This bar lets you quickly access your favorite apps, files and folders. That being said, sometimes it’s a bit crowded.
By default, Apple puts popular apps in its doc, but you likely won’t use all of its offerings. It’s best to customize your dock and organize your screen to better fit your needs.
If you don’t want a particular application or item on your dock anymore, click and hold your mouse on the item and then drag it out of the dock. As you drag it away, the word “Remove” should appear. After you’ve moved the item away, it should disappear from your dock.
To get an item back, or to add a new item, launch a “ Finder ” window.
Search for and select the file of interest, folder or content you want to add and then drag it onto the dock. As long as the item is hovering over the dock bar, it should be added when you release your click.
Three other things that are helpful to know are how to organize your dock, how to change its size and how to alter its orientation. To rearrange the information on your doc, select the item you want to move and drag it to a new location on the dock. Some organize their bar in alphabetical order, by the number of uses or by color.
To change the doc’s size on your mac, click the “Apple” icon on the left-hand side of your upper screen. Select “System Preferences” from the drop-down menu. Afterwards, click “Dock” and “Size.”
Finally, use the slider to increase or decrease the size of your dock. Some docks can also be altered from the desktop itself. If your dock has a line in it, you should be able to hover your mouse over the line to make a size bar populate.
To change your doc’s orientation, click the “Apple” icon followed by “System Preferences.” Then, click on “Dock” followed by “Left,” “Bottom” or “Right,” depending on where you’d like your dock to show up on your desktop.
Think About Smart Folders
One of the most intelligent ways to organize files on your Mac is with Smart Folders. Smart Folders are designed to automatically sort your files based on their subject matter.
To create this type of folder, navigate to “Finder,” “File” and “New Smart Folder.” Next, search for files by entering a phrase, topic or other identifying parameter.
When you do this, your Mac will search for files that have similar contents. If you want to refine your search further, you can click the “Add” button below the search field to increase the number of attributes you’re searching for.
As soon as your search is narrow enough, click “Save.”
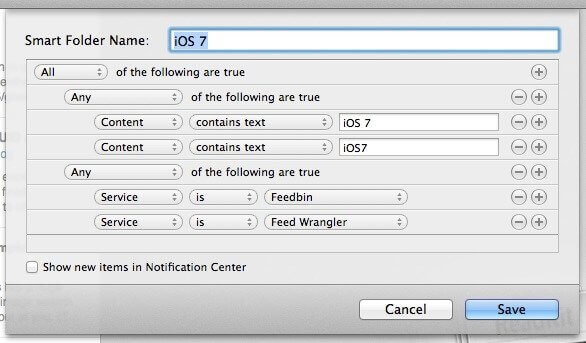
Next, specify the name and location that you’d like for the new Smart Folder you’ve created. As soon as you change, add or remove files from your Mac, your Smart Folder will follow suit.
Naming Is Key
Not surprisingly, Smart Folders aren’t very helpful if your information isn’t organized well in the first place. One of the best ways to make sure you have coherent Smart Folders is to name your files properly right off the bat.
According to Stanford Libraries, you need to be consistent and descriptive when naming your files. One example is to save projects with their title, date and one unique identifier.
There’s no need to use special characters, long file extension numbers or any other type of cryptic writing when you save a file. Instead, keep your names simple, consistent and straightforward.
Finder Is a Great Tool
To organize your documents, files, folders and media properly, you need to learn how to use your Finder. The Finder loads each time your Mac is running, and it stays open during the entire time you use the computer.
To access it, you can either use the “Finder” menu on the top bar of your screen or the “Finder” icon that’s in your dock.
In the event your organization fails you from time to time and you can’t find what you’re looking for, go to your Finder. In the right-hand upper side, you should be able to search by clicking on the magnifying glass in the menu bar, also known as Spotlight.
Once you’re in the search bar, you can type keywords or themes that you believe the document you’re searching for contains in an attempt to locate the misplaced data.
Labels and Tags Are Your Friends
If you have a Mac, you can use labels and tags to make your files easier to locate.
To label a folder or file, right-click on the data and then select a colored tag from the drop-down menu. If you do not have any tags yet saved, start by right-clicking on an item followed by “Tags…”
Once this menu is open, you can create new tags and remove old ones with the plus and minus buttons. To rename a tag or change its color, right-click on it and then change it as you please.
If you want to tag a file you haven’t yet saved, you can generally do so in its title bar.
If you’re working on your week’s grocery shopping list in Word, for instance, you would click on the down arrow next to the document’s name and then under tags, you could assign it to “Shopping,” “Grocery” or whatever other individualized tag you’ve created for this type of data. Another time this would come in handy is to organize and sort your photos after you’ve digitized them.
Stick With the System
Have you ever made a New Year’s resolution and broken it shortly thereafter? Even when you start off with the best intentions, it’s easy to fall back into your established routines and patterns.
To effectively and intelligently organize files on your Mac, you have to stick with your organization plan and be willing to put in the work. Develop a clear strategy that you can follow from beginning to end, even when the going gets tough.
