
Through the years since the advent of the very first camera, people have taken photos and stored them in photo albums, on the walls of their homes and in books as keepsakes and mementos. Since the coming of the digital camera, though, matters have changed quite a bit. For instance, we now tend to keep all of our photos on the computer instead of in physical photo albums tucked away in the house.
Digital cameras allow us the freedom of snapping away with abandon, never having to worry about the cost of developing the film at the end of our photo sessions. As soon as the memory disk is full, we can simply transfer all the photos over to the computer and then we are able to continue taking more and more photos.
But over the years it becomes more and more difficult to keep track of all the photos and find that specific one you want to share with a friend or family member. Instead of having to go through thousands upon thousands of photos looking for the one you want, there is a much easier way.
Just like in the old days with physical photos and photo albums, you are able to create digital photo albums on your computer which will help you in keeping all your photos where you can easily access them.
The time for searching is in the past and the future of digital photo albums is calling your name. We'll walk you through all the steps of creating and maintaining your digital albums on your computer so that you can easily keep track of all your precious memories.
1. It's All In the Name
The first thing to remember when creating your digital photo album is that you need to decide right from the get-go how you want to go about naming your albums. Do you want to have your photos grouped together by year, by event, by month etc? Organizing your photos into albums will be a lot easier (and it will also make it much easier to find at a later date) if you label your albums properly.
For instance, if you only label the album according to the year, you will end up with potentially thousands of photos that you will still need to go through in order to find the one you are looking for. It would be much better to label it more specifically.
For example, if you took photos at a wedding and want to have all the photos together in one album, you could label the album with the name of the couple getting married along with the date. That will help you to find it much more easily at a later date.
To create a photo album on your computer, navigate on over to Start and type in File Explorer. Left-click on File Explorer and then proceed to left-click on Pictures (or My Pictures).
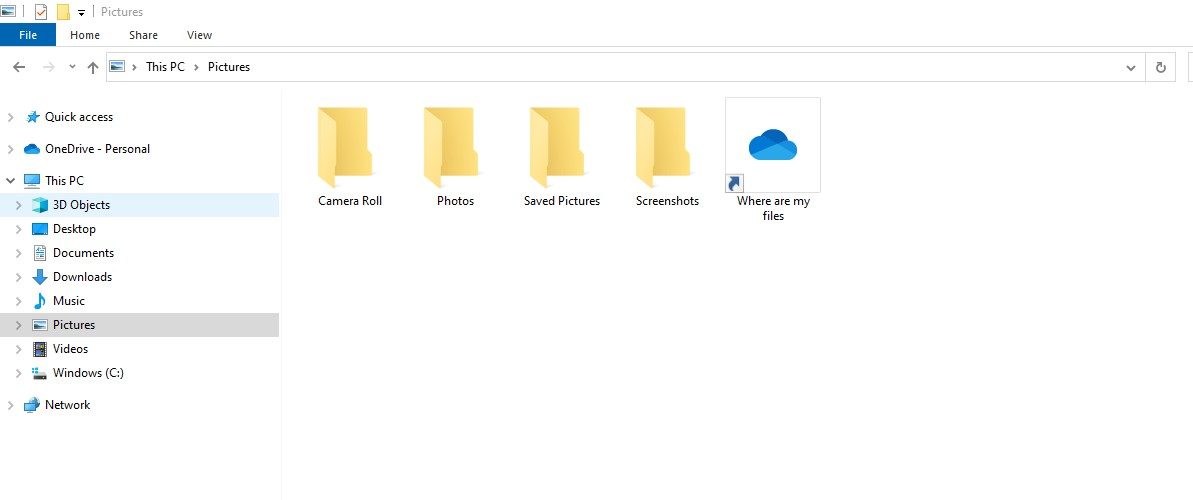
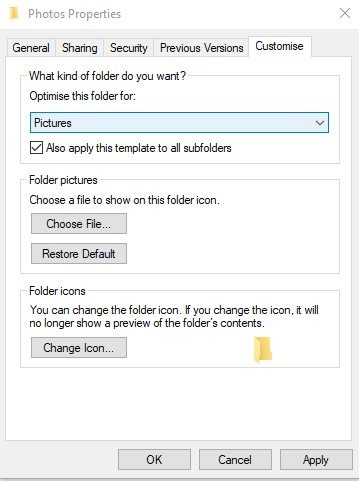
To create a new folder, simply right-click and select New and then select Folder, then you can name it according to your naming preference. Once you have done this, you can then right-click on the newly created folder and then select the Customize tab at the top of the menu and under the heading What kind of folder do you want you can select Pictures (or Photo Album) from the drop-down menu.
May we suggest that you create a folder called Photo Albums and then inside this folder you can create many different folders/albums and name them as you decide? This just keeps all your albums together in one spot and it will be much simpler in future to find them and share them.
2. Store All New Photos In One Place
Before organizing all your photos into the correct albums, it would be best to first download all the photos from your digital camera (or phone) onto your computer and store them all in one central folder. This will just speed up the process of being able to sort through all the photos as you are able to employ your computer to do all the sorting for you.
Once all the photos are stored in a generic folder, you can then open the folder and select all the photos by left-clicking anywhere in the folder and then right-clicking and selecting Group by and then selecting Date.
This will group all your photos by date taken, which will help you to sort through them and add them to the correct album on your computer. From here you can also name each photo individually should you wish to do so.
You can rename a folder or photo by right-clicking on it and selecting Rename. Then all you do is simply type in the name you want and hit Enter.
3. Store and Share With Google
Google has some great features and advantages, one of which is their Photos app. With Google Photos you are able to create albums and share them with friends and family without actually having to send all those many photos via email etc. All you have to do is send a link. This is so much more effective.
Added to this, when you save your photos to your Google Drive, you are also creating a backup should anything go wrong with your computer (which we all hope never happens but unfortunately these things do tend to happen when we least expect them) and you lose all your data.
To create an album on Google Photos, simply open up your web browser of choice and go to Google. Left-click on the group of dots in the top right-hand corner and then select the Photos option.
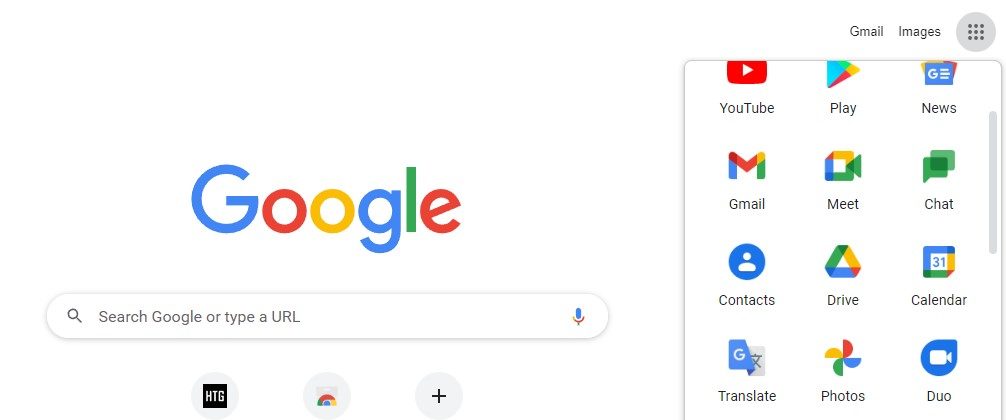
Log in to your Google account and then select the Upload button at the top of the screen. You can then add all of the albums you created on your computer. It may take some time for them all to upload, depending on how fast your internet connection is. Once all the photos have been uploaded to your Google Drive, you can then go ahead and share them, should you wish to do so.
4. Delete the Duplicates
One of the biggest space hoggers on your computer are duplicates. You would be surprised at how many duplicate photos you accumulate over the years and whilst one photo might not take up much space, the accumulative size of all the duplicated photos combined might shock you.
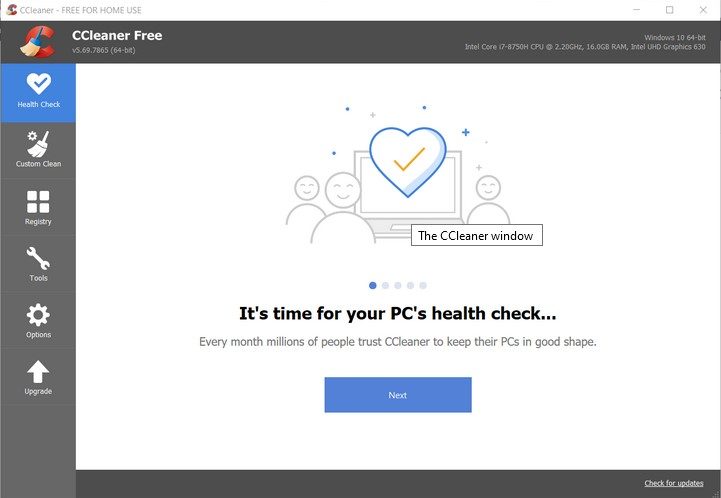
So, to keep on top of things and make sure that you don't have duplicates taking up needed room, make sure that you get rid of all the duplicates before you upload them to your Google Photos or cloud storage. You can run a check for duplicates by using the application CCleaner on your computer.
Left-click on Start, type in CCleaner and then open up the application. In the left-hand pane left-click on the tab that says Tools.
Next you will need to select Duplicate Finder and then configure your search options by selecting the check boxes labeled Name and Size. You can exclude system files and hidden files from your scan by making sure that those check boxes have ticks in them.
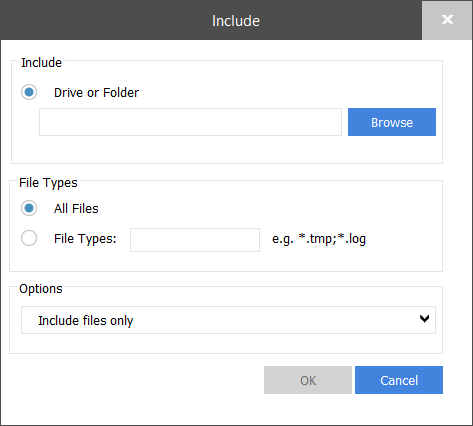
Select the Include tab and then left-click Add to make sure that your photo albums are selected. You can also choose to search only for image duplicates by selecting File Types and typing in .PNG or.JPG so that it only searches for those kinds of files. Now you can left-click on Browse to find and select your folders, then left-click on OK and then left-click on Search to start the scan.
Once the scan has finished running, it will open a window that will show you all of the duplicates. Make sure that you check all the details and then tick the box next to the duplicate you wish to delete. Once you have deleted it, this file can't be recovered.
After selecting all duplicates, simply left-click the Delete Duplicates button at the bottom of the window. All duplicates will then be erased and some extra space will have been freed up.
5. Create a Routine
One of the most important things to remember is that you need to make sure you do a back up regularly. It is something we cannot emphasize enough, especially since you never know what tomorrow may bring. Set aside some time every month to back up all your photos to a hard drive and to your Google drive.
This will ensure that you will always have a copy of your photos no matter what happens.
Not only is it important to back up your photos routinely, but it is also important that you go through and sort your photos regularly. If you set aside time each month to do so then it will never become a big project that you need to tackle and spend hours or even days on. It's always best to save a stitch in time instead of the alternative.
As always, if you're needing any kind of additional help going the digital route with your photo albums, consider reaching out to HelpCloud technicians for remote support.